Extracting GDI dumps files
by TuxTheWise

Why would you want to do that?
- Make your own rips.
- Listen to music or watch the movies that were ripped/downsampled on the release you're playing.
- Obtain GD file order to optimize your rip.
- Verify if a image you have downloaded on internet has no corrupted files.
Initial comments
- This document was written by me to be distributed only by myself. If you want to put it on other site/forum, could you please contact me first?
- You can contact me searching for TuxTheWise in snesorama.us or segahub.org forums.
- Fell free to ask questions or give your opinion, but please do it in this thread and not using PM.
- This is not a guide for dumbs.
Programs needed
I made this pack containing all the programs you need. You can download them separately of course, and using newer versions than the ones in the pack probably will work.
- Daemon Tools: CD drive emulator. Other emulators (Alcohol 120%, CloneDrive, etc) may or may not work for the use of this tutorial.
- IsoBuster: Image/Media analyser/extractor. Similar programs (CDmage, WinISO) may or may not work for the use of this tutorial.
- Iso LBA Fix (isofix) by DeXT What name says and bootfile extractor.
- raw2wav: Converts raw CDDA tracks to wav.
- Random scripts made by myself: Utilities to help the work. You can get them only on the pack, so don't be lazy and download it.
1. Introduction
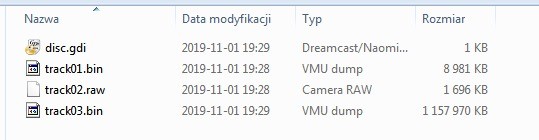
Have the GD dump files on a directory (track01.bin, track02.raw, etc). The .gdi file is not necessary.
As most of you know, a GD disc has two parts: low density (CD, can be read by computer) and high density (only Dreamcast can read). CD part has a small data track and then a small audio track. Data track usually has useless stuff, but can have extra files like wallpapers. That's track01.bin. The audio track is the warning track, the "warning, this disc is for use only on Sega Dreamcast" on american games, a similar message in a lot of languages in european, and "(!*@&#!(*@&#!*(@&#(*" in japanese games. That's track02.raw. Other tracks are all from high density area, and contains the actual files of the game.
2. Extracting CD data track
This is useless most of the time, but it can be done easily by a couple of methods.
2.1. Method 1: IsoBuster
Open track01.bin in IsoBuster ("Open Image File"), select all the files that appeared (click in one and CTRL+A), right click, "Extract Objects" and select a folder to extract.
2.2. Method 2: Daemon Tools
Have at least 1 virtual drive created by Daemon. Click Daemon tray icon and click this drive. Now select track01.bin (you will have to select "All Files (*.*)" to make it show up) and image will be mounted. Now go to My Computer, select the virtual drive and you can just copy/paste the files.
3. Extracting warning audio track
It's already extracted with the name track02.raw, but you probably can't handle this extension. So use raw2wav this way:
raw2wav track02.rawand it will be converted to wav, that you can listen and manipulate the way you want. Note that this conversion has no quality loss.
4. Extracting IP.BIN
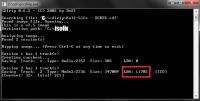
Use isofix in track03.bin this way:
isofix track03.bin 45000and wait it finish. It created a file named "bootfile.bin", rename it to "IP.BIN" and you're done.
NOTE: You can delete "header.iso", but don't delete "fixed.iso" because it will be used soon.
5. Examining file order
Open "fixed.iso" created in last step in IsoBuster. If game have multi data tracks, a red cross will appear next to each file, but don't worry about that.
To examine the file order, see the LBA of each file. Lower numbers mean inner part of disc. You can put the files in LBA order clicking on the title of the column on top.
If you want to extract a list of the files, select the title of disc in left window, right click, "Folder tree and file information", "List tree-info (in txt file)", "LBA, Full path" or "LBA, Relative path", select a directory and a file called FileList.txt will be created. This file has each file and its LBA and can be converted to mkisofs sort file. But that's another subject and probably will be discussed in another tutorial.
6. Extracting high density data
Before going on, there are 3 kinds of data distribution in high density area and you must identify which one your GDI have to know how to extract the files.
6.1. Single data track
Your GDI must have the following files to be in this classification: track01.bin, track02.raw, track03.bin ONLY (and .gdi file of course). If it has any additional .bin or .raw file this method can't be used. Examples that use this distribution: Marvel Vs Capcom 2, Sonic Adventure.
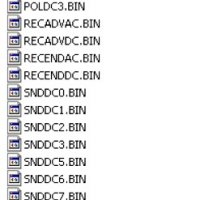
Open the "fixed.iso" in IsoBuster (that was created in section 4) and files will appear in the right window. Select all (select one and CTRL+A), "Extract Objects" and select a folder to extract. You're done.
Alternatively, you can mount "fixed.iso" in Daemon and copy/paste files as told in section 2.2.
6.2. Multi data track without CDDA
Your GDI must have the following files to be in this classification: track01.bin, track02.raw, track03.bin, track04.raw and track05.bin (and .gdi file of course). If it has any additional .raw file this method can't be used. Examples that use this distribution: Tony Hawk's Pro Skater, Grandia II.
Open notepad and create a file containing this:
FILE "track03.bin" BINARY
TRACK 03 MODE1/2352
PREGAP 10:00:00
INDEX 01 00:00:00
POSTGAP 00:02:00

FILE "track04.raw" BINARY
TRACK 04 AUDIO
INDEX 01 00:00:00
POSTGAP 00:02:00

FILE "track05.bin" BINARY
TRACK 05 MODE1/2352
INDEX 01 00:00:00
and save it with .cue extension in the directory of your GD dump files.
Mount the .cue with Daemon Tools (note that the files won't appear on virtual drive on My Computer), open IsoBuster and on top/left corner select the virtual drive of Daemon. Files will appear on right window. Then select all (select one and CTRL+A), "Extract Objects" and select a folder to extract. You're done.
6.3. Multi data track with CDDA
Your GDI must have the following files to be in this classification: track01.bin, track02.raw, track03.bin, a lot of .raw tracks and trackXY.bin (where XY is the number of the last track of the GDI). Examples that use this distribution: Mr. Driller, Nightmare Creatures II.
Open CueCreator.exe ("My Scripts" folder in the programs pack). Type the number of the last track of data (XY from the description of last paragraph) and a file called created.cue will be created. Move it to the directory of your GD dump files. Mount the .cue with Daemon Tools (note that the files won't appear on virtual drive on My Computer), open IsoBuster and on top/left corner select the virtual drive of Daemon. Files will appear on right window. Then select all (select one and CTRL+A), "Extract Objects" and select a folder to extract. You're done.
6.3.1. Batch converting CDDA tracks
CDDA tracks are already extracted under the name of track04.raw, track05.raw, ... , track(XY-1).raw. You can convert each track using raw2wav as described in section 2. However, it can be a time consuming process because games like Nightmare Creatures II have 80+ CDDA tracks. To make job easier, open BatchCreator.exe ("My Script" folder in the programs pack). Make sure to have raw2wav.exe and the tracks you want to convert in the same directory. Then type the track number of the last DATA track (XY), not audio track (XY-1). For example, if your game has track01.bin, ..., track06.raw, track07.raw, track08.bin, you must insert number 8 in the program. A file called "created.bat" will be created. Execute this file and songs will be converted.
7. Last comments
Nothing about track04.raw was commented in this text because usually it's another warning track (same line of track02.raw, but not identical file) that I have no idea why it's there. It can be converted with raw2wav as the other tracks. Usually you can just delete it after extraction (not before!) because it has nothing useful, but I found out that the game Armada has only one CDDA track and it's track04.raw. I don't know about other games, so I would convert and listen this file before deleting it.
8. Thanks
- The nice guys who created the programs used here.
- All people that rip and distribute GDI.
- az_bont for writing this guide that helped me a lot.