GD-ROM backup by Cammel_spit (part 2)

Extracting
Due to the fact that A game with CDDA is allot harder to rip and get working just right, the disk is built a cdda disk with one CDDA track. It's just there to make things harder to rip but we still need it there for some reason.
NOTE:Assuming you are ripping a real Katana game (game with no CDDA like Crazy Taxi and Sonic AD) just drag the track03.iso to the extract.exe in the windows explorer to autoextract all data contained therein. If this is the case just skip to the IP.BIN hacking or downsampling Sections later on.
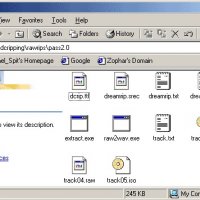
You should have a DIR looking something like this, we extract the *.ISO files like it had cdda...
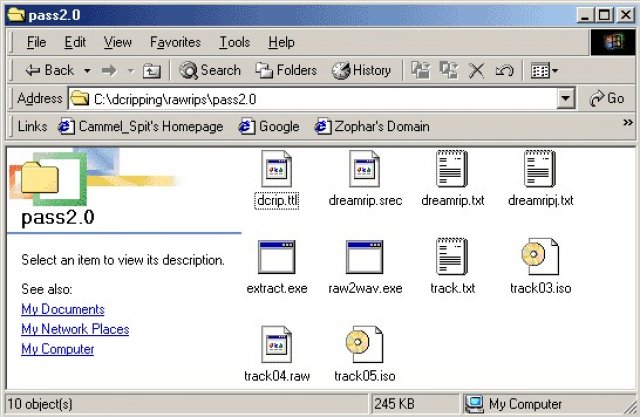

Here Comes the DOS part! Katana only game (Crazy Taxi and Sonic AD) just drag the track03.iso to the extract.exe in the windows explorer to autoextract all data contained therein, the easy way. Or you can go to a DOS window, get into that DIR shown like that above and type...
extract.exe track03.iso
But since the Passport is split into two *.ISO files we need to go to DOS and get some info from the BBArip window... Having fun yet? :-)
Get This number from the BBArip window... The last track's starting LBA in this case 546027, write this down! You may now close the BBArip window.
Now here instead of typing extract.exe track03.iso because it is a CDDA game we type...
extract.exe track03.iso trackYY.iso XXXXXX
Where XXXXXX is the starting LBA of the last DATA track, in this case 546027, and where YY is the number of the last DATA track in this case 05.
If we are going to have the CDDA we would use raw2wav.exe to convert the *.RAW files into *.WAV files that can be burned and played on the backup CDR, To do this go into our nice little DOS window again and type this exact Phrase...
raw2wav *.Raw
That's it! it will take a little time to process the files but that's it!
If you only have a track03.iso and no others than don't worry about CDDA because the audio is held within the data in files like *.ADX,*.AFS, and *.sfd so we wont need and CDDA.
Now that we have the files extracted we need to delete the raw2wav.exe, extract.exe, and their support files... You can either Delete the *.ISO and *.Raw files or you can move the elsewhere for backup purposes it's up to you but if you mess up you'll have to rip from scratch again if you don't back it up!
the DIR should look something like this picture taken from my Sonic AD dir. NOTE:games like crazy taxi have LOTS less files than this... this one has at least a thousand...
Here is where we downsample the game's audio files if need be, but I will skip this for now and get to the nitty gritty of the IP.BIN, 1ST_READ.BIN, and mainexecutables.BIN just in case you're ripping a small game like crazy taxi where no downsampling is needed.
Click here to go to downsampling!
Get the Hack.zip from the links at the top of this document.
Make copy's of the IP.BIN, 1ST_READ.BIN, SG_DPLDR.BIN, and MAIGO.BIN. Don't worry if your rip doesn't have all these files because not all games have the browser and so on.
Run a DOS command window and run hack.exe on all bin files that are game executables. Use your best judgment on what these are, ofcourse run it on those I listed above but also run it on all other "game.bin" files. For instance sonic has a few others too... SONICADV_H00.BIN, SONICADV_H04.BIN, and 2_DP.BIN. Use the structure listed below.
Hack IP.BIN 11700
NOTE: the 11700 is only to be used if your burner can handle 300 sector audio track if not it may require you to use 11702.
NOTE2: if you want this to be NOT selfbooting, e.g. boot loader required, just make it 0 and ignore IP.BIN in fact you can even delete it altogether! Just hack all the other *.Bin files!
The big hassle of IP.BIN or shall I say *.BIN hacking is done... But, if you want this game to boot in another region coded DC like in a Japanese or European console we need the IPBIN4WIN program. This can be found as part of the ECHELON SELFBOOT BATCHFILE in the links at the top of the page.
Open IPBIN4WIN
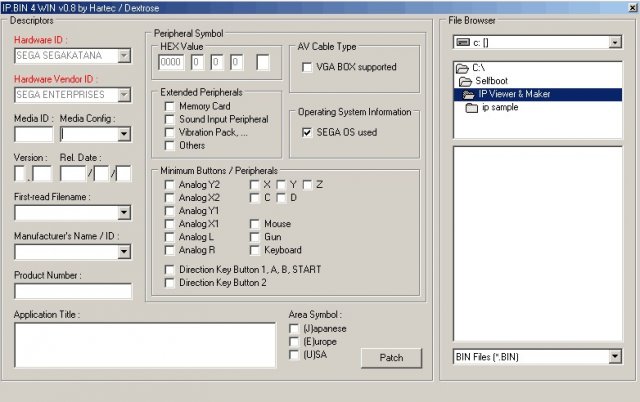

Browse to the IP.BIN file of your game
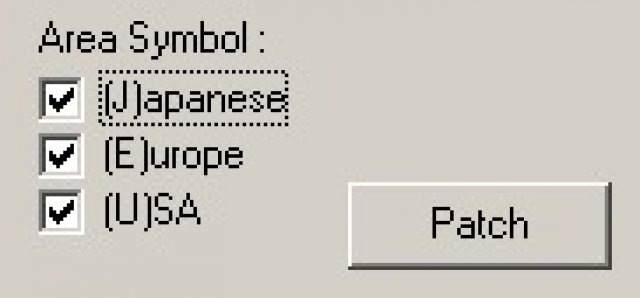
Check all three areasymbols and click patch.

Burning
Method 1 Katana gametype e.g. Sonic AD
If this is a Katana only game with no CDDA (e.g. Sonic AD, Crazy Taxi, Powerstone2) just copy all the hacked game files into the C:\selfboot\data folder inside the echelon selfboot Batchfile available at the links at the top of the page.
Open a DOS window inside the C:\selfboot DIR and type this.
Selfboot Katana 1ST_READ.BIN XXXXXXX
where XXXXXXX is the name of the game you are burning.
NOTE: Not all game's 1ST_READ.BIN is named 1ST_READ.BIN so adjust it as necessary for the game you are ripping.
Method 2 Katana gametype e.g. Sonic AD
MUCH HARDER! ONLY FOR PROFESSIONALS!
There are two ways of doing the first session with the audio track for a selfboot game...
Method1) Download the 11700.rar file at the top of the page.
Burn that sucker... You should have a CDR burnt that has ONE ausio track exactly 300 sectors in length...
Method2) Open your CDR program like CDrecord(Comes with the selfbboot batchfile) or CDRwin and burn the AUDIO.RAW file that comes with the selfboot batchfile...
CDRwin
- Goto "Record Disc"
- Click the button "Load tracks"
- Click add, choose the file AUDIO.RAW
- Click the "Open New Session" tab at the bottom.
- Burn it!
CDRECORD
Open a Dos box and type...
cdrecord -scanbus
That should listed the CDR/CDRW/CDROMs installed. Look for your burner's ID It will be in form x,x,x.
Type the following to record the track...
cdrecord -dev=x,x,x -multi -audio audio.raw
Make sure the 1st_read.bin (Or whatever else it is called) and the ip.bin files are NOT in the C:\selfboot\data but in the C:\selfboot main dir.
if you don't know your burner's scsi id (Doesn't matter whether it is IDE it works for them too) type this in a dos box from your C:\selfboot\...
cdrecord -scanbus
Your burner will be listed there thats the SCSI ID write it down!
Type this at the same DOS box...
cdrecord -dev=x,x,x -msinfo
Where x,x,x is your burner's ID. That should have given you some numbers in the form x,y something like 0,11702 write this down!
Now in the C:\selfboot\ type...
BINHACK.EXE
Give the program the names of the 1st_read.bin (Boot.bin) then the bootsector(ip.bin) and finally the last MSINFO number (e.g.11702)
Move the 1st_read.bin to the data folder.
now we need to make the final DATA.ISO that we will burn as the last track containing the game data.
Open a DOS bot to the C:\selfboot\ DIR and type...
mkisofs -C x,y -V ECHELON -l -o data.iso data
this is crucial that you typed that down exactly as shown above except that the x,y is replaced with the two MSINFO numbers you wrote down earlier (e.g. 0,11702)
Wait for the processing to finish...
Wait for the processing to finish...
Wait for the processing to finish...
Wait for the processing to finish...
Wait some more...
And more...
Get some coffee...
Have lunch...
Oh it's finally done!!!
Ok, now we have to input the ip.bin into the data.iso we just made. To do this we need to open a DOS box and go to the C:\selfboot DIR if now already there and type...
cdrecord -dev=x,x,x -xa1 -*speed* data.iso
Where x,x,x is your burner's ID and *speed* is your burner's top writing speed.
Now just wait even longer for the thing to actually burn!!!
That's it your done! go and play that thing!
GamtypeKatanaCDDA
WARNING! ALL CDDA GAMES MUST BE MADE AND BURNT MANUALLY IF YOU RIPPED THEM YOURSELF OR THEY WILL NOT WORK!!!
I havent made this part yet so for now Ijust copyed and pasted the echelon selfboot tutorial CDDA part......
1) Make a directory on your hard-disk called "selfboot"
2) Unzip this whole file (E-SELFBT.ZIP) to the directory.
3) Download Win32 Binaries for CDRECORD & MKISOFS from:
ftp.fokus.gmd.de/pub/unix/cdrecord/alpha/win32/cdrtools-1.9a03-win32-bin.zip
4) Unzip the file (cdrtools-1.9a03-win32-bin.zip) to the directory you made on your hard disk earlier called "selfboot".
5) Insert the Utopia Boot-CD version of the game into your CD-ROM drive, Copy over the IP.BIN and 1ST_READ.BIN from the CD over to the "selfboot" directory on your hard disk.
(Note 1: IP.BIN cannot be found on Accession releases, therefore Accession releases cannot be made self-boot from this method.)
(Note 2: 1ST_READ.BIN might not be the exact name of the boot filename, If you want to check what the boot filename really is on some games, open up IP.BIN in a hex or text editor. Look on the top, It should say something similar to: "V.001XXXXXXXX BLAH.BIN". If it says this, That means that BLAH.BIN is the boot-filename, and this is the file that you should copy over. If the game is using WinCE this filename will be 0WINCEOS.BIN.
This file will be referred to as BOOT.BIN from here-on.
6) OK, So now in your "selfboot" directory, you should have this tutorial unzipped, cdrecord and all related cdrecord tools, and you should also have copied over the IP.BIN and BOOT.BIN from the game that you are working on.
7) Make a subdirectory called "data" inside your "selfboot" directory and copy ALL game data files from the Utopia-BootCD game into this directory. Also, delete the file IP.BIN from the "data" directory if you already have it in the root of your "selfboot" tree. Also delete the BOOTFILENAME.BIN (generally 1ST_READ.BIN) from your data tree if you have already put this file in the root of your "selfboot" tree.
(Note: All files that you copy from a CD will have Read-Only attributes, You must take these off before continuing.)
8) Make a subdirectory called "cdda" inside your "selfboot" directory tree. Fire up CDRWIN and click the Middle Icon on the top row called "Extract Disc/Tracks/Sectors". Choose your CD Reader in which the original Utopia Boot-CD Game is inserted. Choose the Select Tracks option at the top. As you will see in the Track Selection box at the left, Audio tracks are represented by Red Circles. Click on Tracks 2 - X, where X is the last CDDA track. As you click on them they should be outlined in black. For image filename input: "C:\selfboot\cdda\track", Where C:\selfboot\cdda is the "cdda" directory inside your "selfboot" tree.
9) The above step should have read in CDDA tracks 2 -> End and placed them as WAV files named trackxx.wav inside your "cdda" directory. They should start with track02.wav and go up to trackxx.wav where xx is the last CDDA track on the CD.
10) Open up a DOS Prompt and switch to your "cdda" directory. Type in the following command:
copy track03.wav track01.wav
After doing this, You should have generated Tracks 1 - 3, You should now have 3 4-second dummy tracks as Tracks 1 - 3, and have real CDDA from 4 -> End.
11) Now, you have 2 ways of achieving the same thing for this step, I will go over both ways and you can choose whichever you want. To start off for both methods, insert a blank disk into your CD-Recorder.
1) CDRWIN Method:
- a) Fire up CDRWIN. Goto the first icon on the top left: "Record Disc"
- b) Click the icon in the top right corner: "Load tracks"
- c) Click add, then choose ALL trackxx.wav files in your "cdda" directory. Arrange them in order so they go from track01.wav to the end. Click OK to add them to your disc layout.
- d) Click the tab "Open New Session" near the bottom.
- e) Burn this CD.
2) CDRECORD Method:
a) If your CD-Recorder cannot use the "Open New Session" option
in CDRWIN, You have one more way to do it, that may or may not
work.
b) In the "selfboot" directory you should have the cdrecord toolset
unzipped. You should see files such as cdrecord.exe, mkisofs.exe,
and cygwin1.dll.
c) Run the following command from a DOS Prompt:
cdrecord -scanbus
d) This should show you a list of CD-ROM and CD-Recorder units installed
in your system. Look for your CD-Recorder and find the SCSI Bus ID#.
It will be in format x,x,x. It will also be referred to as x,x,x for
the rest of this tutorial.
e) In your "selfboot" directory, run the following command to record
the 1st session of the disk:
cdrecord -dev=x,x,x -multi -audio \cdda\track01.wav \cdda\track02.wav etc.
Continue going with your track list until you have input all tracks in order. If this whole command does not fit into your DOS Prompt, make a batch file with this long command and run the batch file.
You can optionally include "speed=x" after -audio, Where x is the maximum speed that your CD-Recorder can record at.
12) OK, Now that you have the first session (CDDA) burned, it's time to move onto the second. This is the crucial part so make sure you pay attention and follow things closely. You should already have all game data files in the subdirectory "data", besides the BOOT.BIN and IP.BIN.
13) Read over the CDRECORD burn instructions. Find out the SCSI Bus ID# of your CD-Recorder If you have not done so already. Run the following command:
cdrecord -dev=x,x,x -msinfo
It will spit out a number in the form x,y. Values differ enormously for games that have different amounts of CDDA burned to the first session. Make sure you get the correct value.
14) Run a DOS Prompt and goto your "selfboot" directory, You should have an executable there called "BINHACK.EXE". In addition you should have the BOOT.BIN (generally called 1ST_READ.BIN) and IP.BIN in this directory.
Run the program BINHACK.EXE. When it prompts you for the Binary file to modify, Pick the BOOT.BIN. If it detects that the BOOT.BIN is a Windows CE Exectuable (0WINCEOS.BIN), It will not modify the 0WINCEOS.BIN. If it detects that this Executable is a normal Katana Executable, It will ask you for the the -msinfo number that CDRECORD gave you in the last step. It will then modify the BOOT.BIN according to the number that cdrecord -msinfo gave you.
Next, It will ask you for the filename of the Bootsector. Here, you should input IP.BIN. It will hack the IP.BIN for self-boot purposes.
(Side Note: Only input the 2nd Number that MSINFO gave you, Ex. If it gave you: 0,163012, Input 163012 when BINHACK prompts you for the MSINFO number.)
15) Once the changes are made with BINHACK.EXE to the BOOT.BIN file, Copy the BOOT.BIN over to the "data" directory's root. Please make sure that you did not rename the file to actually be called BOOT.BIN.
It should still be called the original filename that you found out from Step 5.
16) Now, you should have in your "data" directory, All game data files, including BOOT.BIN, But it should not have IP.BIN. If you want to dummy this CD, You must make a dummy now. You must make a normal file dummy. Name this dummy "000DUMMY.DAT" and place it into the "data" directory. Please note the overhead limitations of Multi-Session & Self-Booting that were mentioned at the beginning of the tutorial, and size your dummy accordingly. Your next step is to run MKISOFS and make a .ISO out of these files. Run the following command while you are in your "selfboot" root directory:
mkisofs -C x,y -V ECHELON -l -o data.iso data
"x,y" should be the numbers outputted to you from cdrecord -msinfo earlier.
17) Run "IPINS.EXE" from the "selfboot" directory, In a DOS Prompt. It will prompt you for the Bootsector filename, Choose IP.BIN. It will then prompt you for the .ISO filename, Choose the file "data.iso" which you just generated in the last step. It will patch IP.BIN as the bootsector on data.iso.
18) You should now have a fairly large sized data.iso file sitting in your "selfboot" directory tree now. It is time to burn this file. You should still have the disk you burned the audio session to earlier inserted in your CD-Recorder. You can do this with either CDRWIN or CDRECORD, Just as the Audio Session Burning.
1) CDRWIN Method
a) Fire up CDRWIN.
b) Click the 2nd Icon from the Top Left: "File Backup and Tools".
c) For Backup Tool/Operation: Select "Record an ISO9660 Image File".
d) For Image Filename, Choose data.iso in your "selfboot" directory.
e) Under Recording Options, Select your CD-Recorder. Check the
following options accordingly:
Disc Type: CDROM-XA
Track Mode: MODE2
SPEED: Whatever You Want
Finalize/Close Session: Yes
Write Postgap: Yes
Open New Session: No
Test Mode: No
Verify Recorded Image: No
f) Click the start button and you are burning.
2) CDRECORD Method
a) In the "selfboot" directory you should have the cdrecord toolset
unzipped. You should see files such as cdrecord.exe, mkisofs.exe,
and cygwin1.dll.
b) Run the following command from a DOS Prompt:
cdrecord -scanbus
c) This should show you a list of CD-ROM and CD-Recorder units installed
in your system. Look for your CD-Recorder and find the SCSI Bus ID#.
It will be in format x,x,x.
d) In your "selfboot" directory, run the following command to record
the 2nd session of the disk:
cdrecord -dev=x,x,x -xa1 data.iso
You can optionally include "speed=x" after -audio, Where x is the maximum speed that your CD-Recorder can record at.
19) You are done! Eject the disk and try it in your Dreamcast.
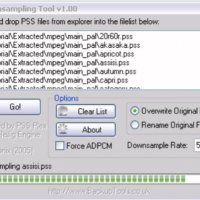
I will now give you two methods on how to downsample *.ADX background audio files.
STEP1) Copy all *.ADX files to a backup directory just in case you screw it up some :-)
STEP2) Convert all the *.ADX files into *.WAV files.
Method 1) Open the cinepack

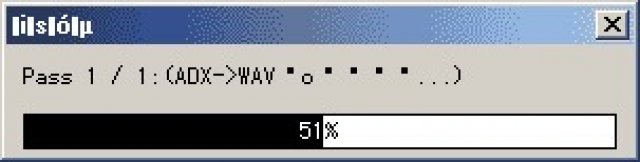
Go to File Open and open the *.ADX file you want to downsample. It should look something like this...
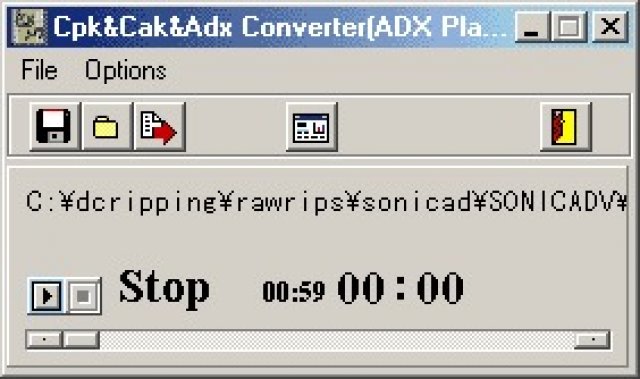

You should see this window

And now you have the *.ADX files as *.WAV files!
STEP 3) Convert these back into *.ADX files but at a lower bit rate or as mono.
Open up the DCmovieCREATOR
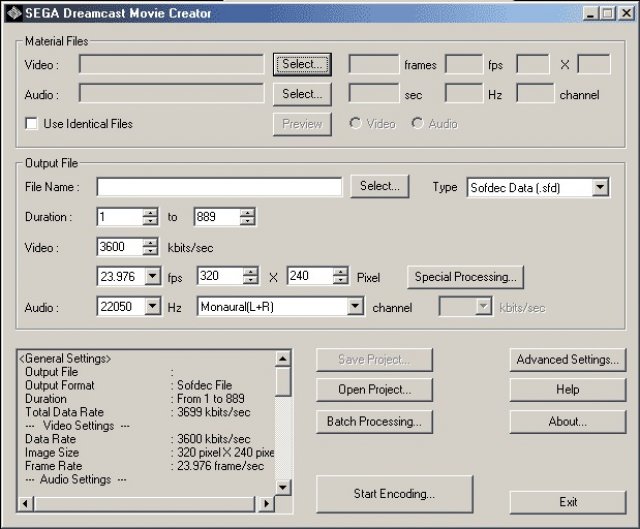

Select the type as sofdec audio *.sfa
Set the perameters you want it to be (22050Hz MonoL+R etc.)
Start Encoding...
rename the *.sfa files to *.ADX files andd your done!
NOTE: This method is not recomended because the *.SFA files are similar to *.ADX but not exactly the same! Like in my sonic rip using this method the background audio does not loop and after the track is done there will be no BG sound untill you exit or enter another stage! Instead use method 2 below besides it's in DOS so you can use wildcards *.XXX instead of file names to downsample many files at one!
Method2)
STEP1) Backup all *.ADX files just in case!
STEP2) unzip the adx2wav.lzh into the dir where the *.ADX files are.
STEP3) Open a DOS box in the dir with all the *.ADX files in it mine is C:\dcripping\rawrips\sonicad\sonicad\ and type...
adx2wav *.adx
STEP4) Wait for processing to finnish then type...
del *.adx
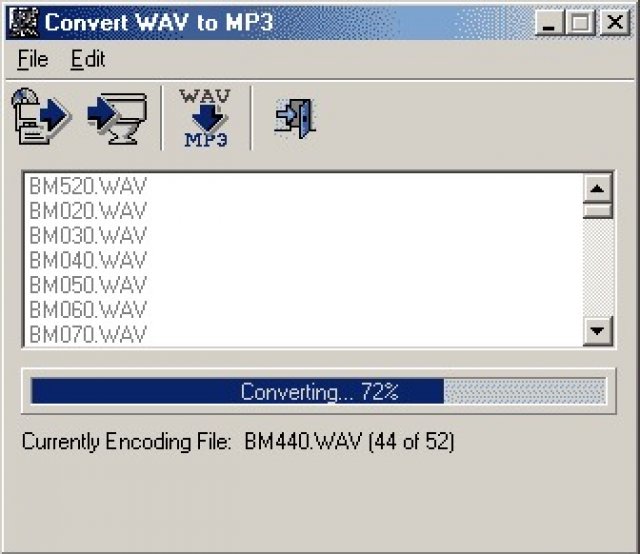
STEP5) Download A progy named media wizard from www.hotfiles.com , install it, go to the conversions menu, wave compression, and downsample the *.WAV files. The process should look something like this...

Open a DOS box where the files and ADXencd are and type.
ADXencd .adx
NOTE: I AM HAVEING PROBLEMS WITH MAKEING THIS PROGRAM HAVE THE ADX FILES LOOP AND USE WILDCARDS ANY HELP WILL BE APPRECIATED!!!
That's it! all the ADX files are downsampled! just copy over the origenals and the burn it once the image will be small enough.
downing *.AFS files
Use the AFS extract on the *.afs file in question to make multiple *.ADX files.
Downsample these as shown above.
Now make a adxtxt.txt with all the *.adx files names in order.
Use afslnk to link the files again like so in the DOS box...
afslnk adxtxt.txt output.afs
thats it!
LAST NOTES!
Thats all I know of for now. I have no WinCE or WinCDA games ripped so thats all I can teach you for now...