Copy Link
Add to Bookmark
Report
Dreamcast Underground

Dreamcast Underground
posted on SEPTEMBER 17, 2000
by HITBSECNEWS
Feeding the underground since 1997
Hi !
This month, we wrote an article about the Dreamcast hehe.
Note that it was written on August the seven so if any ripping method has been released
this article is obsolete.
---------------------------------------------------------------------------------------------
PART 1- DREAMCAST RIP FOR D4 M4SS
---------------------------------------------------------------------------------------------
I) INTRODUCTION
What is the CD-LOADER ?
The CD-LOADER is a boot CD. The original author is the Utopia group. With it, u can play a
copy of your Sega Dreamcast game. Put the CD on your Dreamcast GD-ROM drive and after
just play ALL kind of cd'z u'v g0t (Game copy, European, Japanease, American version).
How can I find the CD-LOADER ?
U can find the CD-LOADER everywhere on those "31337" warez sites.
It's an image disc (Discjuggler, Nero,clone CD version are available).
How can I rip my games ?
Actually, u can't rip your games. U can download them on the web, only Kalisto and
Utopia know how to rip games.
II) RIP GAMEZ METHODS ???
1) The Kalisto method :
Kalisto revealed that they use a Yamaha 400T recorder to rip gamez. They diffuse a prog
composed of 3 files : an executable (dld_dos.exe), a binary and a sfv file.
The technic : The SCSI-ID of the GD recorder will be re initialized. The Aaspi-ID if the SCSi card on
the GD-WRITTER. The recorder reinitialize. It's an increment based on the zero at card.
At the value 11000, for example : dld_dos.exe scsicom.bin 5 0 11000 reinitialize the GD
recorder in ASPI-ID #0, on SCSI.
When u upload the recorder, your Yamaha 400T could read the GD-ROM.
BUT, everybody who tried this method agreed with the fact that it doesn't work at all.
2) _=°101 BYTEZ°=_
Here at 101bytez we thinks that it's probably a connection between the Dreamcast
and the PC in order to rip gamez using a cable connector described below .
From our point of view the PC use the Dreamcast GD-ROM drive to read the games.
With a special program u can do an image disc of your DC game and so burn it with
any burning prog. But remember we are hacker not ripper or cracker so this is only our
poor point of view and if it's not the right method well sorry ;) .
3) | Morph (gamecopyworld.com) point of view|
Well this is Morph point of view on the subject
a) hook up a gd-rom to your pc
haven't seen such yet, I wonder why.
b) write a custom firmware for your DC allowing file transfers
c) write a special bootloader that takes over the system and lets you transfer
data to the outworld
III) THE IMAGE DISC
The DC image disc games are released into a RAR archive like any gud PC release.
u find 2 files :
The binary file and the cuesheet file. U must burn the image after the extraction with CD-RWIN.
Actually, many gamez contain bugs. U must fill the CD-R to avoid bugs and to have a loading as
short as possible (see the IV part).
IV) DUMMY FILES
ok so to avoid bugs and have shorter loading times u must fill the CD-R at his maximum.
This technic is called Dummy. U add a file at the end of your CD-R to fill it. For example,
u have a 74 min CD-R, and the game is 123 Mo. U add a dummy file whose size is 527 Mo. U can
download dummy progz on the net too.
V) PROBLEMS
1) Many games (not yet) have more size than CD-R. U can use a 80 min CD, but if the size is higher, rippers
there is 2 options
a)cut moviez like in GMZ release
b)Burn a game into several cdz with a "please insert cd 2" msg box
2) Many CD recorder can't burn the CD loader.
3) U can't do a copy on the fly of your boot CD.
-------------------------------------------------------------------------------------------------
PART 2 - INTO THE REAL UNDERGROUND
-------------------------------------------------------------------------------------------------
I) Point of view
ok here at 101 we've got a point of view on the rip ; for us the one who download ripped gmz
and show off are shi* and the one who rip the gmz and never say anything are eleet so here
we're entering the eleet section and we'd like to say to utopia that wot they've done is
really excellent we were all thinking that DC ISOS were not burnable and they've shown us
the contrary. So here we go but before going further all information here was provided by
Marcus and his website http://marcus.mangakai.org/dc/
And sure here we forget VMS programming.
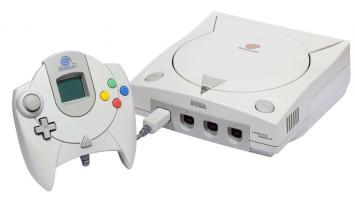
II) Serial port adaptor (Cable)
This serial adaptor has been designed, built and tested by marcus.
It works perfectly for him,
but we will not be held responsible if it fries your DC, your computer.
Also, please note that you will probably only find this interface usable if you're writing
and running your own software for the DC. I don't know of any "standard" software that
communicates anything of interest to a computer on the serial port.
Mini-FAQ:
Q: Will this cable backup my games / turn my computer into a GD-ROM drive / paint my fence / walk my dog / create world peace?
A: Not as such, no. It only enables programs running on the DC and on the computer to communicate with each other.
Q: Where's the software?
A: Here.
Q: Can I use a MAX232 instead of the MAX3222?
A: No, the MAX232 uses TTL levels (+5V). The DC needs CMOS levels (+3.3V).
Here's what you need:
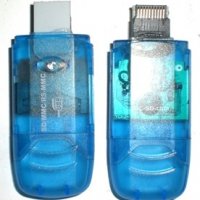
One DCNeoGeo link cable (you can get it at David Console Shop, or Amazon for example)
One MAX3222CPN line driver / voltage converter
Four 0.1µF capacitors
One 9-pin DSUB connector (male)
Some bits of insulated wire
Optionally: A pair of 6-pin connectors (DIN/whatever)
The reason he has used the DCNeoGeo link cable is that it provides the right type of connector
for the DC serial port, removing the need to solder directly on the DC. It also contains a full
set of line drivers, reducing the risk of damaging the DC if you make a mistake.
So what he did was to get the NeoGeo link cable, and cut the NeoGeo-end in half.
This leaves a set of colored wires hanging that can easily be soldered as needed.
You can either connect the cables directly to the MAX, or do as I did and solder on a connector
of your choice (I used a DIN6 connector), allowing you to easily separate the voltage converter,
and reconnect the NeoGeo connector cable end should the need arise.
A third alternative is to remove the NeoGeo cable altogether, and connect directly to the CON1
connector on the link cable circuit board. This is the method pictured on the blueprint below,
but the cable colours are also provided, if you want to use another option.
Below is a picture of the DIN6 variant(the thing just behind the right of the DC is a VGA box,
and not part of the serial adaptor):
*******************
*Picture1 here/*
*******************
Now, the first thing you have to do is get a +3.3V feed.
The CON1 connector (and therefore the NeoGeo cable) has all the necessary signals,
except the voltage needed to drive the MAX chip.
Fortunately, there are several easily accessible locations on the NeoGeo link cable circuit board
where you can tap off the +3.3V.
Open the black box and locate the diode marked D1
(it's right in the center of the right half of the board, surrounded by resistors and transistors
). Just to the left of this diode, there should be a small hole.
This is a through hole for the +3.3V (it passes from the bottom side of the board to the top side
). This is an ideal spot to attach a wire, just put it through the hole and solder it at the
opposite side. Then make a small hole in the side of the plastic box and you can extract the
other end of the wire. In the picture above, you can see a thin green wire coming out of the
box in this way. Note that this wire is the reason I used 6-pin DIN connectors, and not 5-pin.
When you have the +3.3V and the CON1 wires, all that remains is to solder everything together.
*******************
*Picture2 here/*
*******************
To connect the adaptor to a computer, you should use a crossed cable (0-modem).
To connect a modem (no idea why you should want to do that, but hey... :) use a straight cable.
The adaptor has RTS/CTS, so you can use hardware handshaking.
The MAX3222CPN is guaranteed to handle bitrates up to 120kbps.
III) Programming the DC
a) First of all lets see the format of a bootable CD-R:
For a CD-R to be bootable on the Dreamcast, it should have two sessions.
The first should contain only a normal audio track.
It doesn't matter what kind of audio you actually put there, silence is fine.
(It has been suggested that a data track could also be used for the first session.
I haven't tried this myself though.)
The second session should contain a CD/XA data track (mode 2 form 1).
This data track should contain a regular ISO9660 file system, and in the first 16 sectors
a correct bootstrap (IP.BIN).
b) IP.BIN
The IP.BIN is loaded by the ROM to address 8C008000.
It consists of several parts, as this table shows:
Offset Load address Contents
0000-00FF 8C008000-8C0080FF Meta information
0100-02FF 8C008100-8C0082FF Table of contents
0300-36FF 8C008300-8C00B6FF SEGA license screen code
3700-37FF 8C00B700-8C00B7FF Area protection symbols
3800-5FFF 8C00B800-8C00DFFF Bootstrap 1
6000-7FFF 8C00E000-8C00FFFF Bootstrap 2
---META INFO :This part is identical in content to the IP0000.BIN.
It is not necessary to compute a correct checksum for the Device Information field, just writing
0000 works OK.
---Table : Fill with 0
---Sega license :This is the entry point which the ROM calls after both IP.BIN and 1ST_READ.bin
have been loaded. The code here displays the SEGA logo and message "PRODUCED BY OR UNDER LICENSE
FROM SEGA ENTERPRISES, LTD." for about 6 seconds and then transfers control to Bootstrap 1.
Note that the code in this area can not be modified. The ROM checks every byte of it against a
copy in the ROM, and will not boot the disk if there is a difference.
---Area protec : This area contain 8 slots which can either contain the name of a regional area
or spaces. For a disk to be bootable in a certain region, the slot for that region must contain
the appropriate area name. It is therefore not enough just to set the area symbol characters in
the Meta information area. However, if all region names are present here, as they are in the
IP.BIN:s created by IP creator, any set of regions can be selected by placing the appropriate
letters in the Area Symbols field of the Meta information area.
Each of the Area protection slots is prefixed by a branch instruction jumping past it,
as the CPU control actually flows through here on its way to Bootstrap 1.
The individual slots are these:
Slot Region Text
0 Japan "For JAPAN,TAIWAN,PHILIPINES."
1 USA "For USA and CANADA. "
2 Europe "For EUROPE. "
3 Unassigned " "
4 Unassigned " "
5 Unassigned " "
6 Unassigned " "
7 Unassigned " "
---Bootstrap 1 :This code is run once the license screen code completes.
Contrary to the license screen code, this code can be modified.
The default implementation sets up a few hardware registers and then transfers control to
Bootstrap 2.
---Bootstrap 2 :This code is run once Bootstrap 1 completes.
Like Bootstrap 1, it can be modified. The default implementation sets up the CPU stack,
the VBR, disables the cache, and transfers control to the 1ST_READ.BIN.
c) 1ST_READ.BIN file
The 1ST_READ.BIN (or whatever you call it in the Boot filename field of the Meta information
area) is loaded to address 8C010000, i.e. right after the IP.BIN. The boostrap will branch
directly to this address, so it should be a raw binary file without any headers.
(If you have an ELF with a VMA of 0x8c010000, you can convert it with
objcopy -O binary for example.)
An interesting feature of the bootloader is that this file is not loaded continuously into
memory, but instead scatter-loaded in a pseudo-random manner. In order for your program to be
loaded properly, the binary thus first has to be "scrambled".
Here is a complete example on how a scrambled 1ST_READ.BIN could be generated from a C source
file, using cross-compiling GCC and binutils:
sh-elf-gcc -ml -Wl,-Ttext,0x8c010000 -nostartfiles -nostdlib -e _start prog.c -o prog.elf
-lgcc
sh-elf-objcopy -O binary prog.elf prog.bin
scramble prog.bin 1ST_READ.BIN
d) The IP0000.bin file
The IP0000.BIN file is present on every Dreamcast disc,
and contains information about the software on the disc.
The structure described below is repeated in the 16 first sectors of the first Mode-1 track
on the disc (the area reserved for boot code by ISO9660), so it is readable in a normal CD-ROM
player. For the Dreamcast to consider a disc bootable, this structure must also be duplicated
in the high-density region, together with some standard bootstrap code and an additional region
enforcement layer.
All the fields in the IP0000.BIN are plain ASCII, padded with spaces to their full length.
Offset Contents
000-00F Hardware ID (always "SEGA SEGAKATANA ")
010-01F Maker ID (always "SEGA ENTERPRISES")
020-02F Device Information (see below)
030-037 Area Symbols (see below)
038-03F Peripherals (see below)
040-049 Product number ("HDR-nnnn" etc.)
04A-04F Product version
050-05F Release date (YYYYMMDD)
060-06F Boot filename (usually "1ST_READ.BIN")
070-07F Name of the company that produced the disc
080-0FF Name of the software
---peripheral info :
The Device Information field is a 28 bit long bitfield represented by a 7 digit hexadecimal
number. The meaning of the individual bits in each digit is given below:
0000 0000 0000 0000 0000 0000 0000
^^^^ ^^^^ ^^^^ ^^^^ ^^^^ ^ ^
|||| |||| |||| |||| |||| | |
|||| |||| |||| |||| |||| | +----- Uses Windows CE
|||| |||| |||| |||| |||| |
|||| |||| |||| |||| |||| +----- VGA box support
|||| |||| |||| |||| ||||
|||| |||| |||| |||| |||+----- Other expansions
|||| |||| |||| |||| ||+----- Puru Puru pack
|||| |||| |||| |||| |+----- Mike device
|||| |||| |||| |||| +----- Memory card
|||| |||| |||| |||+------ Start + A + B + Directions
|||| |||| |||| ||+------ C button
|||| |||| |||| |+------ D button
|||| |||| |||| +------ X button
|||| |||| |||+------- Y button
|||| |||| ||+------- Z button
|||| |||| |+------- Expanded direction buttons
|||| |||| +------- Analog R trigger
|||| |||+-------- Analog L trigger
|||| ||+-------- Analog horizontal controller
|||| |+-------- Analog vertical controller
|||| +-------- Expanded analog horizontal
|||+--------- Expanded analog vertical
||+--------- Gun
|+--------- Keyboard
+--------- Mouse
---Device info :
The Device Information field begins with a four digit hexadecimal number,
which is some kind of checksum on the Product number and Product version fields.
Then comes the string " GD-ROM", and finally an indication of how many discs this software uses,
and which of these discs that this is. This is indicated by two positive numbers separated with
a slash. So if this is the second disc of three, the Device Information string might be
"8B40 GD-ROM2/3 ".
---Area Symbol :
The Area Symbols string consists of eight characters, which are either space or a specific letter
Each of these represent a geographical region in which the disc is designed to work. So far,
only the first three are assigned. These are Japan (and the rest of East Asia),
USA + Canada, and Europe, respectively. If the character for a particular region is a space,
the disc will not be playable in that region. If it contains the correct region character,
it will be. The region characters for the first three regions are J, U, and E, respectively.
So a disc only playable in Europe would have an Area Symbols string of " E ".
Video Example prog from MARCUS (http://marcus.mangakai.org/dc/)
! Dreamcast Video example by marcus
!
! Set up a simple screen and
! draw some text
!
! To compile into SREC using GNU binutils:
!
! sh-elf-as -little -o video.o video.s
! sh-elf-ld -EL --oformat srec -Ttext 0x8c010000 video.o -o video.srec
.globl start
.text
start:
! First, make sure to run in the P2 area
mov.l setup_cache_addr,r0
mov.l p2_mask,r1
or r1,r0
jmp @r0
nop
setup_cache:
! Now that we are in P2, it's safe
! to enable the cache
mov.l ccr_addr,r0
mov.w ccr_data,r1
mov.l r1,@r0
! After changing CCR, eight instructions
! must be executed before it's safe to enter
! a cached area such as P1
mov.l main_addr,r0 ! 1
mov #0,r1 ! 2
nop ! 3
nop ! 4
nop ! 5
nop ! 6
nop ! 7
nop ! 8
jmp @r0 ! go
mov r1,r0
.align 4
p2_mask:
.long 0xa0000000
setup_cache_addr:
.long setup_cache
main_addr:
.long main
ccr_addr:
.long 0xff00001c
ccr_data:
.word 0x090d
! Real program starts here.
main:
mov.l r14,@-r15
sts pr,r14
! Set up video mode according to A/V cable
bsr check_cable
nop
mov r0,r4
bsr init_video
mov #0,r5
! Clear the screen to black
bsr clrscr
mov #0,r4
! Draw some white text
mov #0,r4
mov #0,r5
mova message,r0
mov r0,r6
bsr draw_string
mov #-1,r7
lds r14,pr
rts
mov.l @r15+,r14
.align 4
message:
.ascii "Hello, world!"
.byte 0
.align 2
! Draw a text string on screen
!
! Assumes a 640*480 screen with RGB555 or RGB565 pixels
! r4 = x
! r5 = y
! r6 = string
! r7 = colour
draw_string:
mov.l r14,@-r15
sts pr,r14
mov.l r13,@-r15
mov.l r12,@-r15
mov.l r11,@-r15
mov.l r10,@-r15
mov r4,r10
mov r5,r11
mov r6,r12
mov r7,r13
ds_loop:
mov.b @r12+,r6
mov r10,r4
mov r11,r5
tst r6,r6 ! string is NUL terminated
bt ds_done
extu.b r6,r6 ! undo sign-extension of char
bsr draw_char12
mov r13,r7
bra ds_loop
add #12,r10
ds_done:
mov.l @r15+,r10
mov.l @r15+,r11
mov.l @r15+,r12
mov.l @r15+,r13
lds r14,pr
rts
mov.l @r15+,r14
! Draw a "narrow" character on screen
!
! Assumes a 640*480 screen with RGB555 or RGB565 pixels
! r4 = x
! r5 = y
! r6 = char
! r7 = colour
draw_char12:
! First get the address of the ROM font
sts pr,r3
mov.l syscall_b4,r0
mov.l @r0,r0
jsr @r0
mov #0,r1
lds r3,pr
mov r0,r2
! Then, compute the destination address
shll r4
mov r5,r0
shll2 r0
add r5,r0
shll8 r0
add r4,r0
mov.l vrambase,r1
add r1,r0
! Find right char in font
mov #32,r1
cmp/gt r1,r6
bt okchar1
! no interlace
mov #1,r4
add r1,r4 ! add one line to offset => display every other line
add #0x50,r2 ! enable LACE
nonlace:
shll8 r4
shll2 r4
add r3,r4
add #-1,r4
shll8 r4
shll2 r4
add r1,r4
add #-1,r4
mov.l r4,@(0x1c,r0)
mov.l @r15+,r4
add #0x7c,r0
mov.l r2,@(0x14,r0)
! Set vertical pos and border
mov #36,r1
mov r1,r2
shll16 r1
or r2,r1
mov.l r1,@(0x34,r0)
add r3,r1
mov.l r1,@(0x20,r0)
! Horizontal pos
mov.w hpos,r1
mov.l r1,@(0x30,r0)
! Select RGB/CVBS
mov.l cvbsbase,r1
rotr r4
bf/s rgbmode
mov #0,r0
mov #3,r0
rgbmode:
shll8 r0
mov.l r0,@r1
rts
nop
.align 4
videobase:
.long 0xa05f8000
cvbsbase:
.long 0xa0702c00
bppshifttab:
.byte 1,1,0,2
hpos:
.word 0xa4
! Check type of A/V cable connected
!
! 0 = VGA
! 1 = ---
! 2 = RGB
! 3 = Composite
check_cable:
! set PORT8 and PORT9 to input
mov.l porta,r0
mov.l pctra_clr,r2
mov.l @r0,r1
mov.l pctra_set,r3
and r2,r1
or r3,r1
mov.l r1,@r0
! read PORT8 and PORT9
mov.w @(4,r0),r0
shlr8 r0,r0
rts
and #3,r0
.align 4
porta:
.long 0xff80002c
pctra_clr:
.long 0xfff0ffff
pctra_set:
.long 0x000a0000
.end
------------------------------------------------------------------------------------------------
PART 3 : OTHER DREAMCAST UTILITYZ
------------------------------------------------------------------------------------------------
I) DIVX on your Dreamcast
Yes it is possible to play DiVX on u'r dreamcast but u need to have at least 3 thingz
1-an AVI video compressed using DIVX CODEC
2-Sega DC movie creator prog (7.5 mega)
3-Files to put with the video on the CD.(warner.pvr+ / manatee.drv+ /Softdec.pvr+ /
1st_read.bin+/0gdtex.pvr+ / Ginxfer.bin+ / lp.bin+ /Movie.bin+
So first of all convert the sound inSofdec Audio (.sfa)Using movie creator (15min)
then encode video using Sofdec data with a bitrate of 850 (15h )
Name u'r video BUMPER.SFD and put it in the movie burn it with the other files and that's it