PS2 DVD9 Layer1 file tutorial (part 1)

Note: Before starting, please be aware PS2 DVD9 discs have (2) layers with the primary layer being referred to as layer0 and the secondary layer being referred to as layer1.
Scope: The purpose of this tutorial is to teach people how to view and extract files from layer1 of PS2 DVD9 (dual-layered) discs so that legal DVDR back-ups can be made from the original discs.
Tools: You will need a PS2 DVD9 game disc and three tools for this process- namely DVD Decrypter (http://www.dvddecrypter.com), iSOBuster (http://www.smart-projects.net/isobuster), and WinHex (http://www.winhex.com).
CREATING YOUR DVD9 .iSO FILE
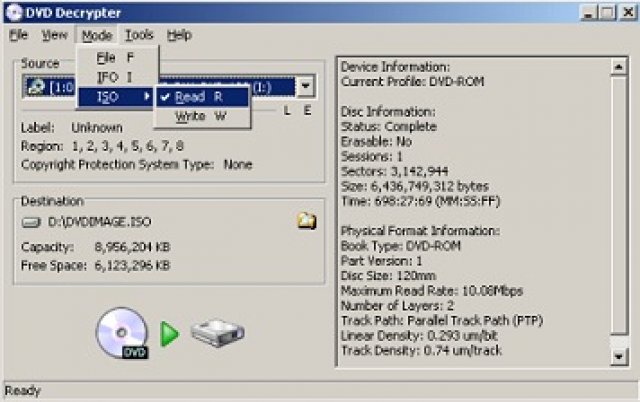
The first step is to create your DVD9 .iSO file from your original PS2 DVD9 game disc. This is done by inserting the disc in your DVD reader drive, and then opening DVD Decrypter and on the MODE tab selecting ISO and making sure Read is checked as shown here:

Next, select your DVD reader from the SOURCE drop-down menu that contains your PS2 DVD9 game disc and then click on the folder icon to the right of DESTINATION to select a place on your HDD with enough space to save the image. I recommend having around 10GB free to do this to be safe. Now, just press the Decrypt button in the bottom left (DVD icon) and sit back, relax, and wait for your .iSO file to be made!
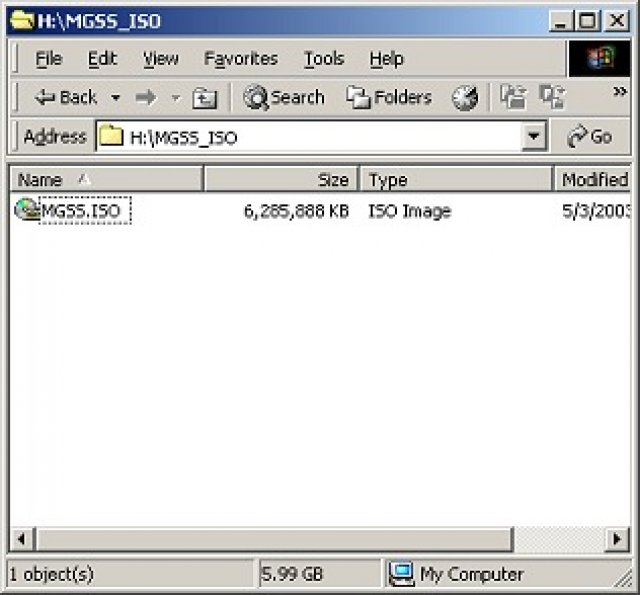
When you are all done, you should have a .iSO file larger than 4.7GB if you followed the steps and it’s really a PS2 DVD9 game disc as shown:

FINDING THE END SPLIT POINT OFFSET
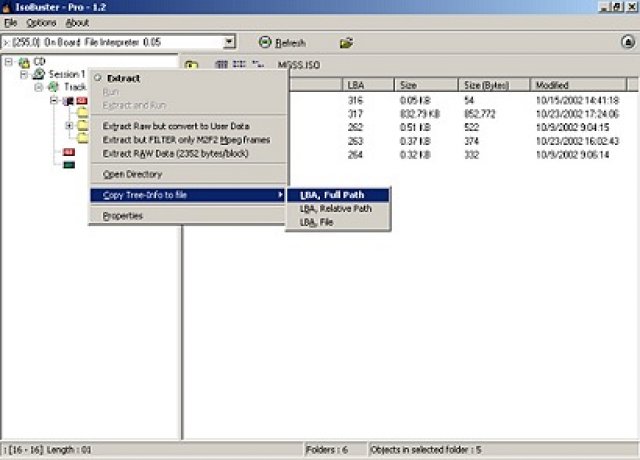
To find the end split point, open your newly-created .iSO file in iSOBuster and right-click on the RED “ISO” icon and select Copy Tree-Info to file -> LBA, Full Path and it will prompt you to select a location to export a FileList.txt file.

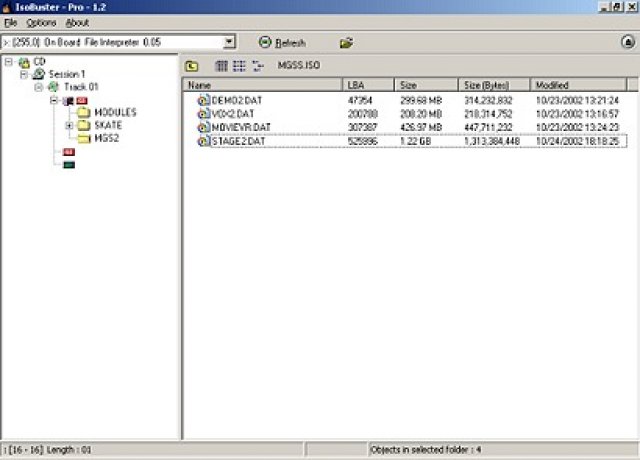
Once you have done this you can minimize iSOBuster for now, and open the FileList.txt it created to look for the last viewable file entry in the list which will always be at the very bottom of the list. In this case, for Metal Gear Solid: Substance (USA) it’s:
0525996 , >:\MGS2\STAGE2.DAT
Next, make NOTE of the file Size (Bytes) of the last viewable file while in iSOBuster... in this case it’s STAGE2.DAT and is 1,313,384,448:

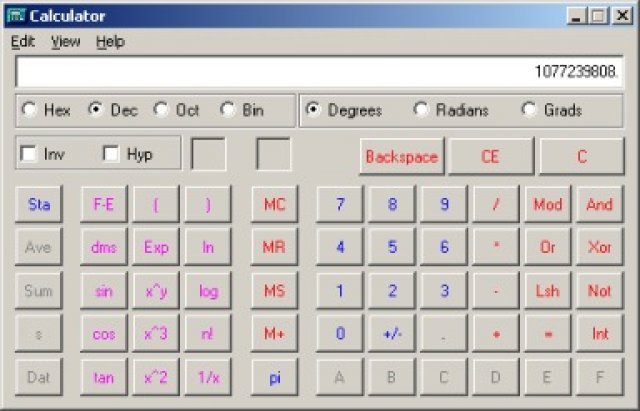
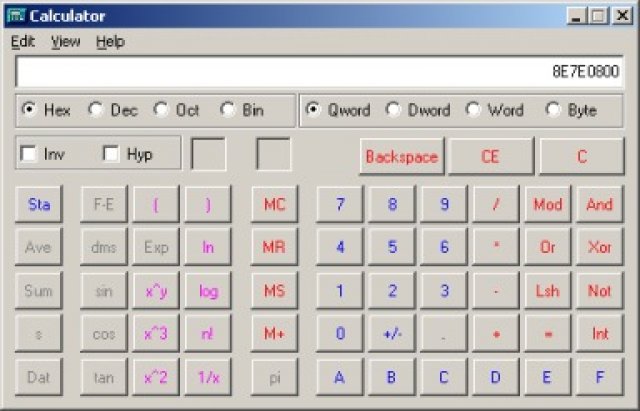
Exit iSOBuster, and now using the Windows calculator do the multiplication as follows:
525996 * 2048 (bytes) = 1077239808 in Dec mode as shown here:

Next, add the file Size of the last viewable file (STAGE2.DAT in this case) to the product of our last equasion so it will now be:
1077239808 + 1313384448 = 2390624256 which is the decimal offset of the end of the layer0 file from the DVD9 disc.
Now, click the Hex button on the calculator to obtain the layer0 end offset which (in this case for MGS: Substance) is 8E7E0800:

SPLITTING YOUR .iSO IMAGE USING SPLIT POINTS
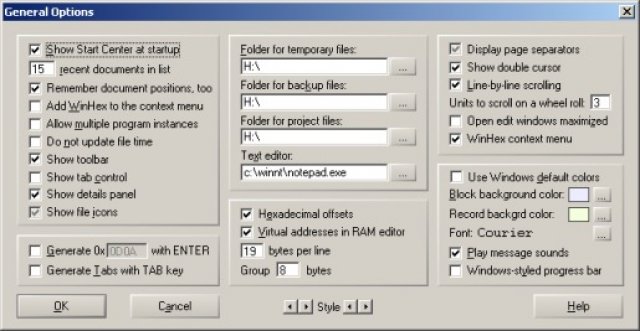
Using WinHex, open your DVD9 .iSO image by using File, selecting Open from the menu, and then selecting your .iSO image. Go to the OPTIONS tab and then GENERAL, and ensure Hexadecimal offsets is checked as shown here in the center, and that your TEMP file paths point to somewhere on your HDD with at least 10GB of free space to save and then click OK as shown here to close the menu:

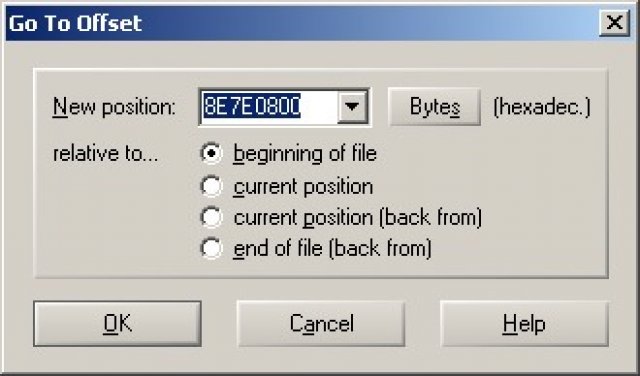
Now, click on the POSITION tab in WinHex and select Go To Offset... and enter the layer0 end offset you just found which (in this case) happens to be 8E7E0800, ensure the radio button next to beginning of file is checked and press OK as shown:

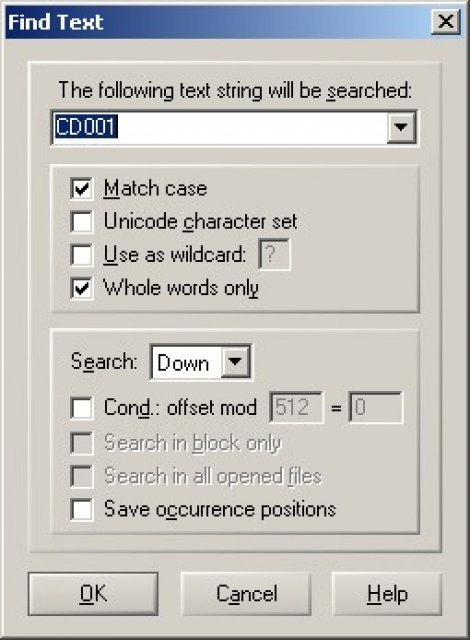
Once WinHex jumps to that offset, click on the SEARCH tab and select Find Text... and inside the box type CD001 and be sure Match case and Whole words only are checked as shown here along with Search Down:

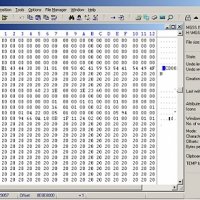
Once it finds the first occurrence you should see CD001..PLAYSTATION in the right hand margin, so use your left arrow on the keyboard to back-up 1 place (NOT the Backspace key) and NOTE the offset now at the bottom of the screen (in this case it’s Offset: 8E8E0000):
Move your mouse cursor over to corresponding gray box on the left-hand side of the screen as shown in the above picture and you’ll see the 0 in 01 is in the gray box. Right-click on this gray box, and select Beginning of block and then (once marked) scroll down to the end of the .iSO image and right-click on the last character there (in this case it’s 0) and select end of block. You should now see the whole section highlighted, and so go to the EDIT tab and select Copy Block then Into New File as shown here:
Now select where you want to save it on your HDD... this is layer1 you are saving of the DVD9 disc as layer0 is viewable using Windows Explorer because it’s listed normally in the game’s T.O.C. file. Sit back and wait for it to copy block and save on your HDD in your selected location... visit www.ps2ownz.com or IRC Efnet #PS2OWNZ.COM while you’re waiting if you’d like!
VIEWING LAYER1 (HIDDEN FILES) OF YOUR DVD9 .ISO
To view and extract the layer1 (hidden files) from your DVD9 .iSO simply open up iSOBuster again and select your saved layer1 file (if it’s a .dat extension file simply rename it to gamename.iso before opening) by going to the FILE tab and clicking Open Image File as shown below. Lastly, to extract the files just right-click on them and choose Extract and you’re ready to start rebuilding your DVD9Rip!