HDAdvance tutorial
Before Start to use the HDadvance, you should install a Harddisk (harddisk) in the PS2.

How to install the harddisk
1. An official PS2 network adapter. Either adapters that are shown in the picture can be used.


2. A Suitable hard disk. You can use the official hard disk or a standard IDE hard disk drive with a capacity of 40GB/80GB/120GB/200GB(only HDAdvance 3.0 can support 200GB harddisk). If you use a standard IDE drive, you will need to make sure that it actually fits into your network adapter. Most Western Digital drives do not physically fit onto the PS2 network adapter without some modification, so we recommend that you stay clear of this brand. There are also issues with some modern Seagate drives, which cause problems when used in conjunction with older models of the official PS2 network adapter. We recommend using a Maxtor or Hitachi brand harddisk with HDAdvance. If HDAdvance freezes at the splash screen for you, then it is due to the conflict mentioned above. In order to resolve this you will either need to purchase a new hard disk drive or network adapter.
3. A PS2 with a "Bay-Type" expansion port. All PS2's will have this expansion port except for the first three Japanese models (SCPH 10000, SCPH 15000 and SCPH 18000) which have a PCMCIA expansion port instead. These models are not supported by HDAdvance.
How to Install Your Hard Disk
If you have an official PS2 hard disk drive, then please install it according to the directions in its manual. If you will be using a standard IDE hard disk drive, then please make sure that the hard disk drive you intend to connect to your PS2 will actually fit into your network adapter.
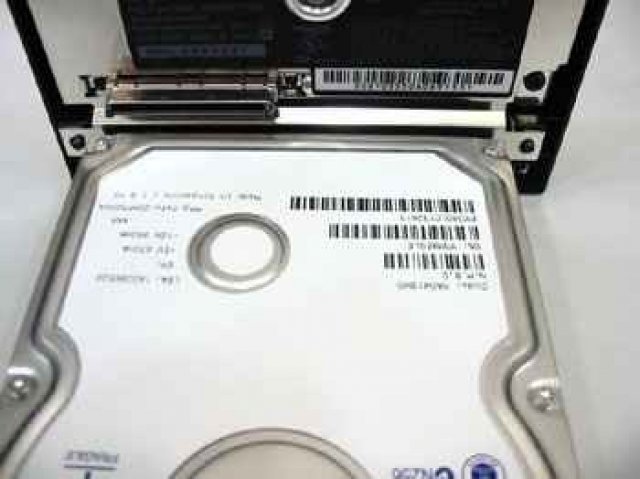
Check that the IDE and power ports on your hard disk drive properly align with the IDE and power connectors on your network adapter.
Configure the jumper setting on the hard disk drive so it is set to MASTER. To find the correct jumper settings for your hard disk drive, either check the label on top of the hard disk drive or consult your reference manual.
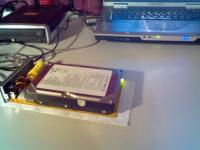
Attach the hard disk drive to the network adapter by lining up the IDE and power ports/connectors and pressing firmly, as shown in Picture.

Carefully slide the hard disk drive into the PS2 expansion bay as shown below. Push until the network adapter is connected to the back of your PS2, then screw in the screws on the back of the network adapter to secure the hard disk drive and network adapter. Congratulations, you have successfully connected a hard disk drive to your PS2!
How to use the HDAdvance
Using HDAdvance
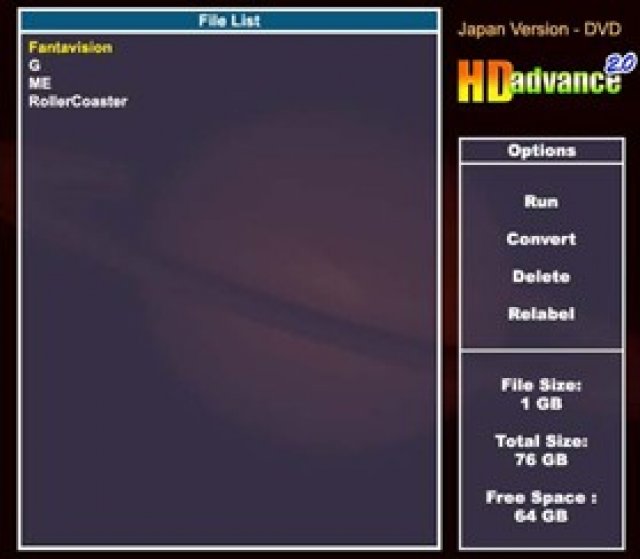
At the main screen, you can see a list of files currently converted on your hard disk and an Options menu which you may use to start playing a game, convert a new game, delete or relabel an existing game. At any point, either the File List Panel or the Options Panel is in focus. Use the left and right buttons on our controller to switch between the File List Panel and Options Panel in order to select files or perform any action (Run, Convert, Delete, Relabel).

Configure the jumper setting on the hard disk drive so it is set to MASTER. To find the correct jumper settings for your hard disk drive, either check the label on top of the hard disk drive or consult your reference manual. Attach the hard disk drive to the network adapter by lining up the IDE and power ports/connectors and pressing firmly, as shown in Picture.
File Conversion
When you choose to convert a new game onto your hard disk, you will be prompted to insert your game disk. Eject the HDAdvance CD, insert your game disk and select “Continue” by pressing X. HDAdvance will then scan your disc to make sure everything is in order, and if there are no problems you will be asked to enter the name of your game using the name selection panel.
The controls for the name selection panel are as follows:
D-Pad – Move the selection
X – Select character
O – Backspace
L1 – Cursor left
R1 – Cursor right
L2 – Cursor start
R2 – Cursor end
Select “End” when you have finished entering the name for your game to proceed to the actual conversion, or select “Cancel” to return to the main screen. When conversion begins you will be shown a progress bar for the conversion as well as statistics such as the time remaining.
Mode Setting
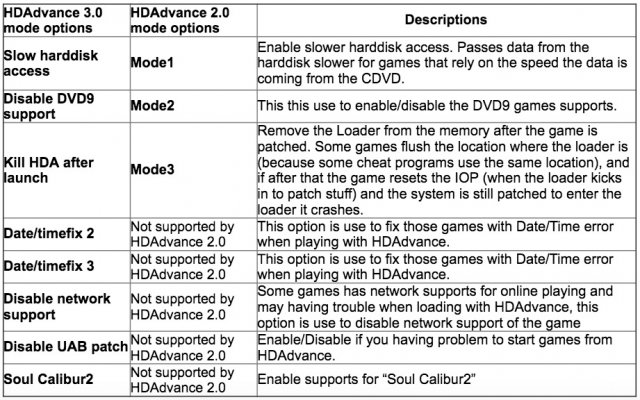
Normally, over 95% of games work with HDAdvance without flaw when running from your hard disk drive. Some of the games require compatibility modes enabled before they will work properly with HDAdvance. In order to enable one or more compatibility modes for a game, have the game selected in the game list and press SELECT on your controller. This will bring up the compatibility settings menu. From here you can individually enable or disable each of the three compatibility modes. Pressing X to change the mode enable/disable. Pressing SELECT button after you have done the setting.

Deleting a Game
When you select “Delete” from the Options, you will be prompted to delete the game which is currently selected in the File List. If you are sure that you wish to delete the game, select “Continue”.
Relabelling a Game
When you select “Relabel” from the Options, you will be taken to the name selection panel and you may edit the name of the game currently selected in the File List. The controls are the same as for the Conversion name selection panel, as described above. Select “End” to relabel the game or “Cancel” to return to the main screen without relabelling the selected game.
Converting your own legal *Backup Disc/Import Game Disc
Please follow the steps below so as to convert backup disc / import game disc to PS2 harddisk.
- Boot your console with HDAdvance. Using the CD version for CD backups/imports and the DVD version for DVD backups/imports.
- Choose ”Convert” in the “Option” menu.
- When the system asks for the game disc, please use the Slide Tool or Flip Top Cover to exchange the backup/import with the HDAdvance Disc.
- Press “X” when you are finished.
*Slide Tool or Flip Top Cover is needed for converting backups/imports
How to install DVD-9 games from computer to PS2 (for HDAdvance 3.0 only)
Note:
- You have to follow this method to convert DVD-9 games/DVD-9 backup/ DVD-9 import games.(no matter you have Slide Tool / Flip Top Cover or not)
- If you are going to convert DVD/CD games, using the ordinary method is ok.
- If you are going to convert DVD/CD backups/import games, you should use the ordinary method with Slide Tool / Flip Top Cover
- If your PS2 console does not equip with Slide Tool / Flip Top Cover, you can use the following method to convert DVD/CD backup / import games.
Several tools are needed for converting games from computer to PS2:
- A crossover cable(if you connect the PS2 to computer directly) / an ordinary LAN cable(if you connect the PS2 to computer by hubs)
- Two programs: one is DVD Decrypter and the other one is HDAdvance Dump.
Step 1: Convert DVD-9 game to .ISO format
Before you transferring the DVD-9 games to PS2 from computer, you need to convert the game file to .ISO format.
DVD Decrypter can help you to do conversion. Please download it and install it to computer. You will see the following screen after you launch the program.
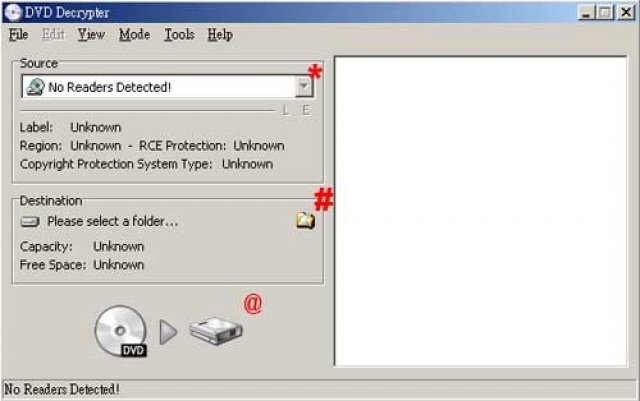

Click "Mode" on the menu bar and then choose ISO --> Read.
Click the pull down menu(*) to choose the source DVD Rom which you put the DVD-9/DVD/CD game in.
Click the folder icon(#) to locate the destination where you want the ISO file to be put in.
Finally, click the icon at the bottom(@). Then, the program will start to convert the DVD-9/DVD/CD game to .ISO format.
Step 2: Transferring .ISO file from computer to PS2
There are two ways to transfer .ISO file from computer to PS2 harddisk.
Method 1:
Download the HDAdvance Dump program.
Make sure the BB unit is attached to PS2 and the PS2 is connected with computer via cable.
'Press and hold' any key on JoyPad1 and then boot HDAdvance 3.0 on PS2. HDAdvance Server mode will be launched automatically.
Please follow the steps below to assign a IP address to your computer so as to make the connection between PS2 and Computer successful.
- Click "Start" --> "Control Panel" --> "Network Connections"
- Right Click "Local Area Networks" --> "Properties" and you will see the following screen


- Double Click "Internet Protocol(TCP/IP)"
- Click the "Use the following IP address" option
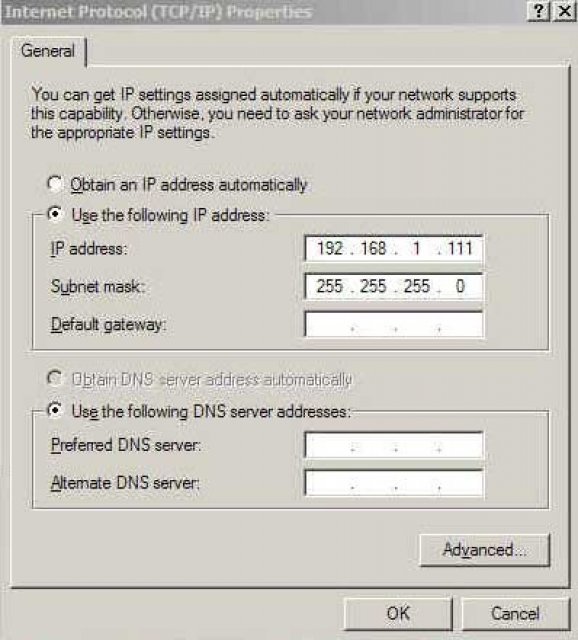

- In the IP Address text box, please type: 192.168.1.111
- In the Subnet Mask text box, please type: 255.255.255.0
- Leave the Default Gateway blank
- Click "OK" to confirm the setting.
Launch the HDAdvance Dump program and you will see the following screen:
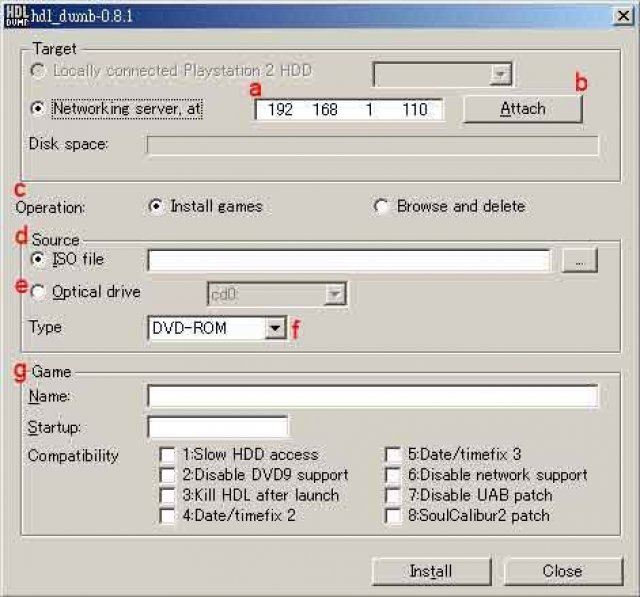

- Please leave it unchanged in the "Networking server, at" text box(a).
- Click the button "Attach"(b), the program will start to connect to PS2.
- If the connection succeeds, "Disk space" will show the harddisk volume and the free space information.
- In the "Operation" section(c), you can choose "Install games" to transfer game file to PS2 or "Browse and delete" to manage the game files in the harddisk.
- For transferring DVD-9 games, in the "Source" section(d), click the "ISO file" option and locate the .ISO file which you are going to transfer. Then, select "DVD-ROM" in the pull down menu(f).
- Another option - "Optical drive"(e) allows you to convert DVD/CD games from computer DVD-ROM/CD-ROM directly. If you are going to convert DVD game, please select "DVD-ROM" in the pull down menu(f). If you are going to convert CD game, please select "CD-ROM" in the pull down menu(f).
- After you locate the .ISO file, information will be shown in the "Game" section(g). You can rename the game file in the "Name" text box. However, please do not change the value in the "Startup" text box.
- Finally, click the "Install" button at the bottom to start transferring game file to PS2.
Method 2 (Recommended for transferring several games at the same time):
- Attach your harddisk to PS2 with Network Adaptor and then boot HDAdvance 3.0 on PS2
- Use the “Format” command to format the harddisk.
- After that, detach the harddisk and connect to the IDE port of your computer.
- Launch the HDL_Dumb program
- The program will automatically detect a PS2 harddisk is connected with computer. The option “Locally connected Playstation 2 harddisk” will be enabled. If there are more than one PS2 harddisk is connected with computer, you can choose the correct harddisk on the pull down menu at the right hand side of the option.
- In the "Operation" section(c), you can choose "Install games" to transfer game file to PS2 or "Browse and delete" to manage the game files in the harddisk.
- For transferring DVD-9 games, in the "Source" section(d), click the "ISO file" option and locate the .ISO file which you are going to transfer. Then, select "DVD-ROM" in the pull down menu(f).
- Another option - "Optical drive"(e) allows you to convert DVD/CD games from computer DVD-ROM/CD-ROM directly. If you are going to convert DVD game, please select "DVD-ROM" in the pull down menu(f). If you are going to convert CD game, please select "CD-ROM" in the pull down menu(f).
- After you locate the .ISO file, information will be shown in the "Game" section(g). You can rename the game file in the "Name" text box. However, please do not change the value in the "Startup" text box.
- Finally, click the "Install" button at the bottom to start transferring game file to PS2.