Flashing TSOP With ANY Version XBOX (V1.0-V1.5) For Noobs

Created BY : SLuSHIE
Created ON: Tuesday, March 30 th , 2004
Best viewed in Microsoft Word
If viewed in Wordpad, enlarge the pictures to make them clearer.
*NOTE* I am not responsible for any damage you do to your XBOX. Do this at your own risk. If you follow this guide, read it over a couple of times, and TAKE YOUR TIME, you will have no problem with this. The only person responsible for screwing up your XBOX is YOU. Have fun.
Introduction:
By doing this flash, you will be able to do EVERYTHING a person WITH a modchip can do. The only thing you can’t do, only if you have a V1.2/1.3/1.4/1.5 XBOX is use XBOX LIVE. If you have a V1.0/1.1 and want to use XBOX LIVE, you can add a switch, so basically you can do EVERYTHING a person can do with an X-Ecuter2 Modchip, which is all covered in this guide.
Things you will need:
- An Unmodded XBOX
- A Modded XBOX (To transfer the gamesave to)
- A Memory Card (To copy the gamesaves to)
- 15 - 20 WATT Soldering Iron
- Solder
- Some Wire
- Hot Glue Gun / Electrical Tape (For a SECURE Connection)
- TORX 10/20 Screwdrivers (To open XBOX and take Hard Drive & DVD-ROM Drive out)
- Basic Knowledge on how to solder
- SPST Lighted Rocker Switch (Needed only if you have a V1.0/1.1 XBOX and still wish to use XBOX LIVE after flashing your TSOP. You can get the switch from HERE
- An original copy of James Bond 007: Agent Under Fire
- XBTOOL (If you wish to edit your BIOS to your preference)
- 007 Hacked Gamesave WITH Raincoat 0.7 (Make sure you have V0.7 of Raincoat)
- A Computer (obviously)
- Knowledge of FTPing into your XBOX Console
- A TV
- XBOX Controller
- Audio Exploit Game Save Hack (Needed for after you flash, so you can connect XBOX to PC and put whatever dashboard and other stuff you want on there).
Let’s Get Started:
Alright…so you have everything you need? Let’s begin. You need to find out which XBOX Version you have. Go HERE to find out.
If you have an XBOX V1.0/1.1 Follow this:
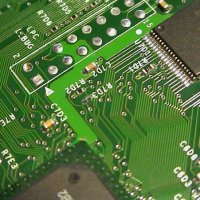
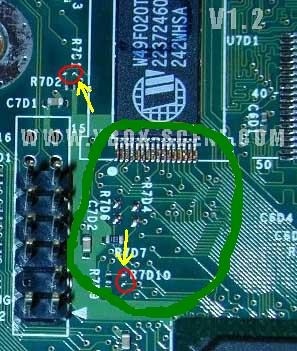
Fire up your soldering iron, and open up your XBOX. There are 6 screws on the bottom of it. Once you have the top cover off, unplug the IDE and Power from your XBOX Hard Drive. Then take the screw out, to free the Hard Drive. Next, take the 2 screws out of the DVD-ROM Drive (in the front left and right corner) Then lift the drive up, and take out the IDE and yellow cable from your DVD-ROM Drive. Now unplug everything that’s connected to the motherboard (The power supply connector is the hardest to get out, just yank it out. Once everything is disconnected from the motherboard, there’s 11 screws holding it down. Remove those 11 screws. Now you have to identify what TSOP you have. There’s: WINBOND, ST, SHARP, and HYNIX also known as HYUNDAI. The TSOP is located here:
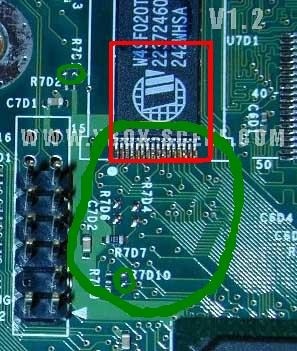

(Ignore the green circles, just study the Red Square). As you can see, this is a WINBOND.
If you have a SHARP TSOP , instructions are below.
If you have a WINBOND , ST , or HYNIX / HYUNDAI chip, follow these instructions:

Once again, ignore the green circles. Just focus on the red circle. You have to join those 2 points together, which is also called bridging. There is 2 ways you can do this: 1) Just put a bit of solder on your soldering iron, heat up both points, and make a bridge between them so they are both touching. 2) Connect a wire from 1 of the points to the other. (The 1 st way is the easiest).
Next, just drop some hot glue over the points to secure the connection, or electrical tape will do to.
Now, flip your motherboard over. Grab a little piece of wire, strip a little off the ends, and connect these 2 points:
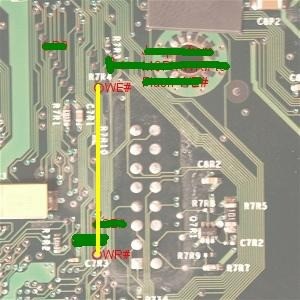

Ignore the green lines, just study the WE# and WR# and yellow line. All you have to do here is connect one end of your wire to WE#, and the other end to WR#.
Now you have the option to install a switch if you like, you don’t have to, it’s a bit extra work, but it pays off, and allows you to use XBOX LIVE.
*NOTE* For placement of the switch, the best place is in between the Ethernet and Audio plug-ins in the back of the XBOX, just put it a bit higher then that. Just use a dremel tool to drill a nice hole and fit it in nice, put some hot glue on to secure the connection.
If your not going to install a switch, flip the motherboard back over, and put all of the 11 screws back in. If you are going to install a switch, get three pieces of wire about 12 inches long each, and strip the ends. You need to connect one more wire on the bottom of your motherboard.

Ignore the green circle, just focus on the A19 POINT where the arrow is pointing to. Solder one end of the three wires you stripped to the A19 point, and once again put a blob of hot glue or a piece of electrical tape for a safe fit. Put the motherboard back in, and make sure you bring that one wire connected from the A19 point on top of the motherboard with you, and connect that to the MIDDLE point on the switch.
(Top of motherboard) Ignore the green lines and study the VCC3.3 POINT the yellow arrow is pointing to. Just connect another wire to that point, and run it to the POWER POINT on the switch. (It will say what points are which on the switch).
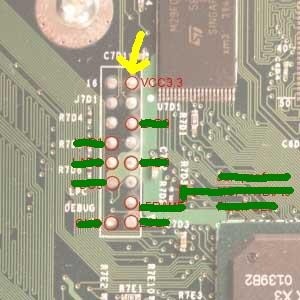

*NOTE* As you can see in the pic, that TSOP is an ST TSOP.
*NOTE* It can be hard to get the wires to stick onto the switch’s connections, all you have to do is just heat up the metal on the switch so you will get a good stick. MAKE SURE 100% that all wires are connected on switch before proceeding to flash BIOS.
Tug on them and make sure they are on, sometimes they may look on, but are loose.
For the last wire on the switch, which is the GND (Ground POINT), all you have to do is run a wire from the GND POINT on the switch to the Metal Chassis anywhere on the XBOX.
Now all you have to do is make sure ALL connections are 100% SECURE, and that the switch is on the ON POSITION (POWER).
Put your XBOX back together, you don’t have to put the top cover on just leave it off just incase. You are now ready for the exciting part, flashing!!! (Scroll down to FLASHING section).
If You Have a SHARP TSOP:
Join these 2 points with some wire on the back of the motherboard:


And follow the same solder points for HYNIX / HYUNDAI, ST, and WINBOND, and same points with the switch. The SHARP TSOP has the exact same connections as a HYNIX / HYUNDIA, ST, and WINBOND, though it just needs this 1 more connection.
If you have an XBOX V1.2/1.3/1.4/1.5 Follow this:
The solder points for a V1.2/1.3/1.4/1.5 XBOX are extremely easy. Much easier then the V1.0/1.1 XBOX Consoles. There is only one downfall: No switch. Only bad if you want to use XBOX LIVE, otherwise your lucky.
Fire up your soldering iron, and open up your XBOX. There are 6 screws on the bottom of it. Once you have the top cover off, unplug the IDE and Power from your XBOX Hard Drive. Then take the screw out, to free the Hard Drive. Next, take the 2 screws out of the DVD-ROM Drive (in the front left and right corner) Then lift the drive up, and take out the IDE and yellow cable from your DVD-ROM Drive. Identify what TSOP you have: ST, WINBOND, or HYNIX / HYUNDAI.
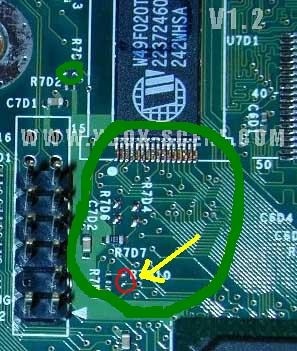
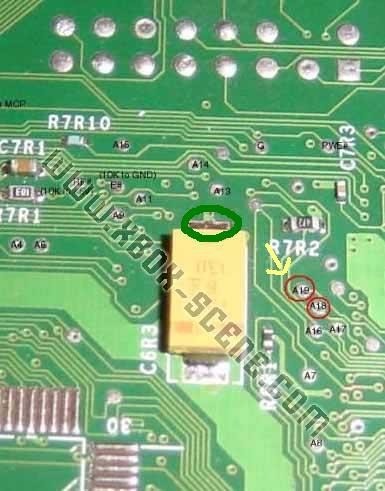
Now the good thing about V1.2/1.3/1.4/1.5 Consoles are that you don’t even have to take out the motherboard. Just bridge these 2 sets of points:

Ignore the green circle, and focus on the 2 red circles with the yellow arrow. Simply bridge both points in the circle together, making sure they are touching each other. Done.
Put your XBOX Console back together, everything except the top lid. You are now ready to flash.
FLASHING:
Next up get the 007 with Raincoat from xbins. Replace their V0.5 Raincoat with V0.7. (Just go into the raincoat folder in the game save, delete the old raincoat, and stick the new 0.7 raincoat in there. Once that is done, you need a BIOS. Now here is how it works.
- If you have a V1.0/1.1 XBOX Console AND using a switch, you need a 512 KB BIOS.
- If you have a V1.0/1.1 XBOX Console and ARE NOT using a switch, you need a 1 MB (1024 KB) BIOS.
- If you have a V1.2/1.3/1.4/1.5 XBOX Console you need a 256 KB BIOS.
The BIOS I highly recommend is X-ecuter 2 4981 BIOS. (4981.06_256k.bin). It can also be obtained from xbins. I am going use the X-Ecuter 2 4981 BIOS for this example because it is the BEST BIOS and is MULTI which works for ALL VERSIONS of XBOX.
Once you have obtained the X-Ecuter 2 4981 BIOS (It’s 256 KB when you download it, don’t worry just follow along) open up XBTOOL. Here is a picture of XBTOOL, I will explain what everything is and what to do.
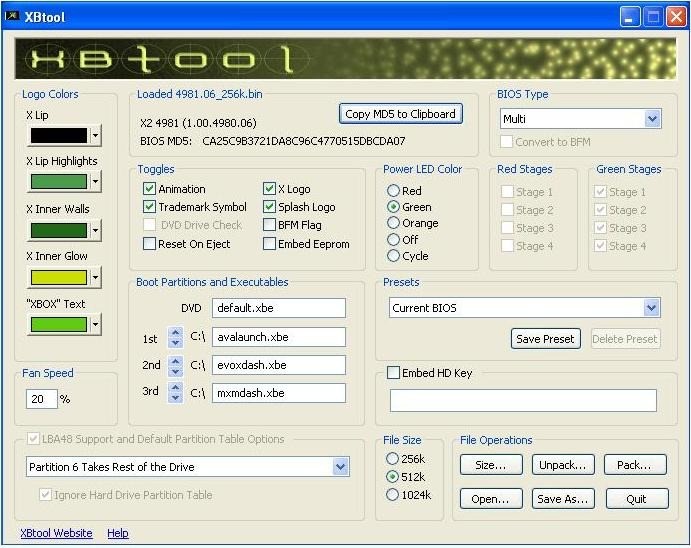

Click “Open” Then locate your 4981.06_256k.bin.
LOGO COLORS: These are when you boot the XBOX, the colors you get. There are pics a little farther down explaining this better.
LOADED BIOS: (Located right beside logo colors) this is just simply what BIOS you have loaded into XBTOOL being X-Ecuter 2 4981 in this case.
BIOS TYPE: This just means what versions this BIOS is compatible on. In this case all XBOX Versions, being MULTI.
TOGGLES: Just the stuff that goes on when booting the XBOX. I would just leave these how is.
POWER LED COLOR: Which color you want your Power / Eject button to be when this BIOS is loaded. You can choose any color, the Stages beside it just ignore, it goes with which color you choose.
FAN SPEED: What speed your fan goes at. Just put it anywhere between 20% and 25%
BOOT PARTITIONS AND EXECUTABLES: Leave DVD how is, this is just what the BIOS will look for to boot 1 st . Example is when you just flashed and boot your XBOX with the BIOS, it will load the Microsoft Dashboard. But after say when you put Avalaunch or Evolution-X on it, it will load that BEFORE the Microsoft Dashboard. Pretty simple stuff. Change that to your convenience.
PRESETS: Ignore this.
EMBED HD KEY: Leave it unchecked and ignore it.
LBA SUPPORT: Ignore it, we don’t need it.
FILE SIZE: OK, once you have configured your BIOS on how you like it, choose your correct file size. If you have a V1.0/1.1 WITH SWITCH click on 512 KB BIOS. If you have a V1.0/1.1 WITH NO SWITCH, check 1024 KB BIOS. If you have a V1.2/1.3/1.4/1.5, then check 256 KB BIOS. Then click Save as, and save it as “bios.bin”.
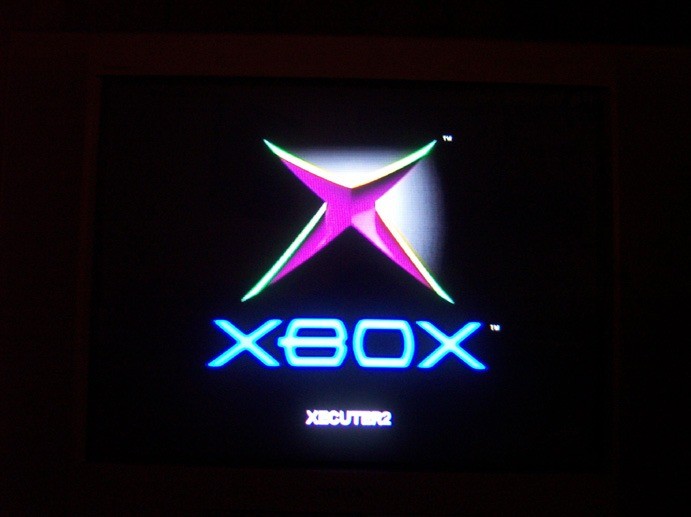

This is what I meant about the LOGO COLORS. Just mess around with the colors, and you get something like this.
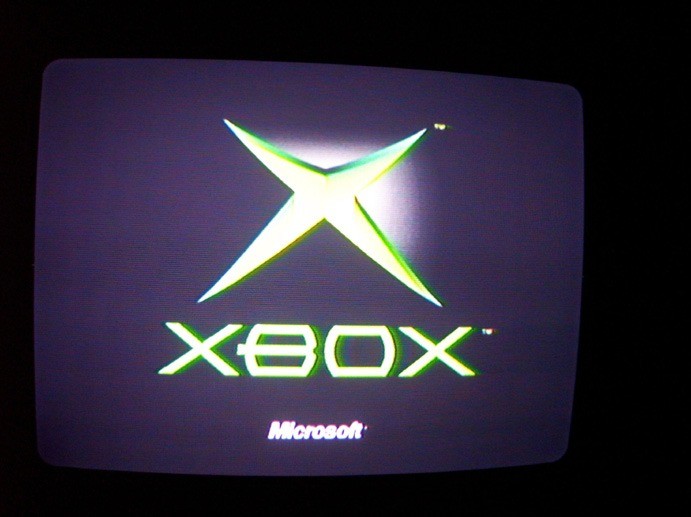

This is the real Microsoft Dashboard. Can you tell the difference?
Now once that’s done, put your bios.bin in the RAINCOAT dir in the gamesave.
The bios.bin should be in the \UDATA\4541000d\000000000000\raincoat dir.
Now, once that is complete, connect your XBOX to your PC using FlashFXP (Recommended, though any FTP client will work), and send this game save to your XBOX. Just make a folder called 4541000d in your E\UDATA folder, and send everything to it starting with the 000000000000 folder and TitleMeta.xbx file. So when you enter E\UDATA\4541000d on your XBOX, the 1 st 2 things you should see are the 000000000000 folder and TitleMeta.xbx file. Once that’s done, put that game save onto your memory card. Then copy it to the unmodded XBOX that you are about to flash.
* NOTE* Now this is important, for people using a switch, make sure it is on the “ON” position, (You can tell by seeing a dim light shining out of the switch), if it’s not, recheck all your points. (Remember I told you not to completely close your XBOX incase of this). Once you are ready to proceed, take the memory card out of your controller (You should have the game save now on the unmodded XBOX, boot up the ORIGINAL copy of James Bond 007: Agent Under Fire. Go to “Load Mission” in the main menu.
Your power / eject button should have turned orange. Then shortly after you will hear an orchestra singing. Now open up a DOS PROMPT, Type everything EXACTLY how it is here minus the “ quotes:
“telnet 192.168.0.64”
Then it will ask you for a username, its: “root”
Then it will ask you for a password, its: “xbox”
Now type this EXACTLY like this, without the “ quotes:
“cd ../../media/E/UDATA/4541000d/000000000000/raincoat”
Now you will see “#” , if you get something other then that, you don’t have the newest raincoat 0.7, GET IT BEFORE PROCEEDING!!!
( *NOTE* you will have to do the copying save to XBOX and memory card again).
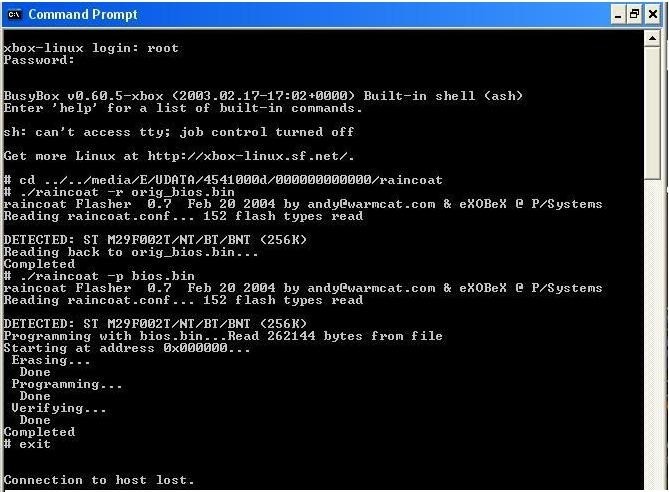
Now type: “./raincoat -r orig_bios.bin” and the “.” Is needed. This will backup your current, original BIOS.
Now type: “./raincoat -p bios.bin” and take a DEEEEP breath, and don’t move. It’s now flashing with your new BIOS.
*NOTE* REMEMBER to type everything exactly how I have it here, or else this will not work for you.
When it says “Completed” , type “exit” It will then say “Connection to host lost.” Wait a few seconds, and turn your XBOX off.
Then turn it back on, and if all went well, you should get your funky colors, and XECUTER2 in place of MICROSOFT.
If you installed a switch, it should obviously be ON, and you should get your funky colors and the XECUTER2 on the bottom. Then flip the switch to the OFF position, and you should get the original Microsoft on the bottom. You did it!!! Pat yourself on the back and go get that well deserved beer!!!
Now if you do get the fragging, which is blinking red and green and no video and audio, your XBOX is in trouble. If you have a V1.0/1.1 XBOX, it might be fixable, with the switch…..I will not go in depth explaining this, but just check out xbox-scene, and their great forums, where a lot of people can help you. Though, following this 100% you shouldn’t be getting any fragging, nor anything going wrong.
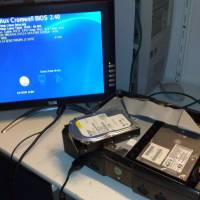
Here is some pictures of one of my successfully flashed V1.4 XBOX (256 KB BIOS), and a V1.0 XBOX (1MB BIOS):

SUCCESSFULLY FLASHED ST TSOP 256 KB BIOS
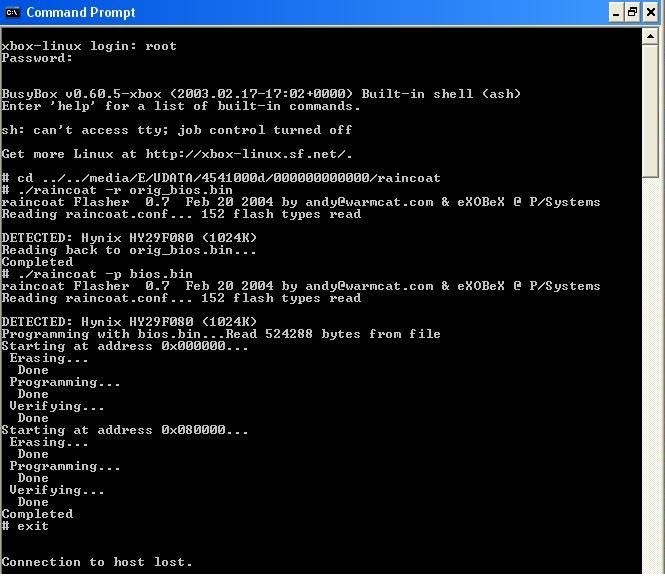

SUCCESSFULLY FLASHED HYNIX TSOP 1 MB BIOS
Now you can just simply Copy the Exploit Bond game save hack to your modded XBOX, then to your memory card, and to your now flashed XBOX. Delete the game save from your now flashed XBOX, and copy the Exploit game save to it. Load up 007 once again, and then Load Mission. You should now see EVO-X. Simply go to the Network Settings, Check your IP, connect your XBOX to PC, copy EVO-X or Avalaunch or whatever you want as your Dashboard, reboot, and have fun.
Have any questions? Problems? E-Mail me at slushie_slushie_@hotmail.com
You can also contact me on mIRC on #xbox on EFNET as slushie
I have made a file with ALL of the tools necessary to do this tutorial for you people if you can’t find them. If you message / E-mail me requesting the file, have an FTP ready, because the file is too big to go through E-mail, and I can’t DCC files through EFNET because of major router and firewall problems, unless we can find someone dedicated to host this file. Thanks, I hope you enjoyed this tutorial and all went well for you.
-SLuSHIE