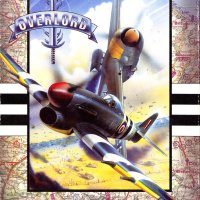
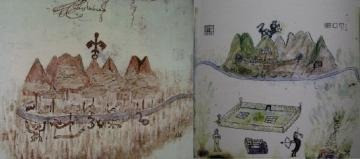
Overlord (Quick Start Tour)


Quick Start Tour
For OVERLORD
Virgin Mastertronic
If you plan to follow this tour around Overlord's control system, make sure you challenged Wotok after the startup sequence.
During play, you'll notice that the ten main Control Icons that appear on the Main Screen are also dotted around on the other Control Screens in Overlord. For the purposes of this example game sequence, we'll return to the main screen by clicking the right mouse button and then access the Control Icons, rather than use the shortcuts. That way, you'll regularly get the chance to check incoming messages. (With practice, you'll soon learn how to use the more direct routes around Overlord.)
While you're busy doing things on other screens, you'll notice the `Incoming Message' flash that appears so often. It's worth returning to the main screen every so often to check messages - progress reports are provided, and random events are announced that demand you to take appropriate action in response.
Establishing A Sound Economy On Starbase
It's a good idea to begin a game by consolidating your position on Starbase. First, let's review the position you inherited at the start of the new game.
- Click on the Government Screen Icon to call up the Government Screen. Detailed data on Starbase is now presented. readouts show the current stocks of Food, Minerals and Fuel, and the levels of Energy and Credits that you have in reserve. The number of people on Starbase, their morale and the current rate of population growth are also shown, along with the tax rate currently in force. If the 'select a planet' message is showing, click on Starbase's name in the central grid to make it the current planet.
The tax rate can be adjusted by clicking on the arrows next to the readout - altering tax rates affects the population's morale and rate of growth as well as how rapidly you can raise money from the people by taxation. The more people you have on a planet, the more Food they consume per day, and at the moment your Food stocks on Starbase are finite - so the first thing to do is to buy yourself a little time and raise some extra cash into the bargain. Slow down the rate of population growth by raising the tax rate to between 30% and 40%.
Horticultural Stations, Mining Stations and Solar Satellite Generators are needed to keep your planet alive.
- Click on the Buy Icon to call up a list of things you can buy. Buy the Horticultural Station, Mining Station and the Solar Satellite Generator. Clicking on the BUY Icon makes the purchase, providing you can afford it, then click the right mouse button to confirm the purchase.
- Click on the Cargo Bay Icon to call up the Crago Bay Screen. Select Farming..1 from the docking bay and click the Crew Icon. Then select Mining..1 from the docking bays and click the Crew Icon.
- Click the right mouse button to return to the Main Screen. Click on the Planet Icon, and click on Farming..1 and Mining..1 from the docking bays. then click the On/Off Icon to activate the Farming..1 and the Mining..1 Stations.
- Go to the Navigation Screen and Click on Solar..1. Then click on the Launch Icon (The far left icon at the top of the screen)
You now have your Starbase up and running, We will continue with setting up armies and equiping them.
Enlisting An Army
When you first enter a planet system, you dont have an army - but you do have the capacity to draft up to 24 platoon, which can each contain up to 200 troops, drafted from the civilian population on Starbase.
Soldiers can be used defensively as well as offensively and it's a good idea to establish a garrison on a Starbase early in the game. We'll recruit four Platoons with the intension of moving two to the new colony and leaving two on Starbase as a garrison.
Now click on the Platoon Management Icon to call up the Platoon Management Screen. There are three windows at the top of the screen - the one on the left shows the identifying number of the current Platoon, the one in the middle labelled 'Troops' shows how many soldiers are currently in that Platoon, and the one on the right shows the current civilian population on Starbase.
'1st' is now showing in the Platoon Identify window at the left. Click on the up arrow next to the Troops Window - it is currently displaying '0'. Hold the mouse button down and release it when the number in this Drafting Window reaches 200.
You'll notice that the civilian population has decreased by 200. Soldiers cannot be taxed - so the revenue you raise from the Starbase population per unit of time will decrease until the population is replenished by the forces of nature. On the plus side, soldiers do not consume Food from your stores, so drafting civilians takes the pressure off Food reserves. The moment you draft civilians into a Platoon, the green soldier at the bottom right of the screen starts running - this indicates that the rookies are undergoing training. The percentage figure at the feet of this running soldier reveals how well trained the recruits are, and indicates the rank of their commanding officer. The fighting abilities of a Platoon are increased in proportion to the level of training the men receive before being commissioned.
Click once on the up arrow next to the window that is showing '1st'to select the '2nd' Platoon, then assign men from the civilian population by clicking and holding on the up arrow next to the Drafting Window until it displays '200'. The 2nd Platoon is now in training.
Repeat the process for the 3rd and 4th Platoons, then click on the right mouse button to leave your recruits in training and return to the Main Screen.
Colonizing Other Planets
When you enter a planet system for the first time, only two of the planets can support sentient life: your base, and the enemy's base at the other end of the system. All other planets are completely barren - if you move the planet cursor up and down the System Map by clicking on the up and down arrows to the right of the circular display, you'll notice that the planets in the middle of the system appear as lifeless, grey worlds in the video window. (the double-headed arrow allows you to slide the cursor up and down the System Map - see System Map later in this manual.)
In order to expand your territory, you need to buy an Atmosphere Processor and dispatch it to one of the unformatted planets. After a while, the Atmosphere Processor will render the planet habitable and a seed colony will automatically be established. Your new colony will start out with a few people and will have some resources in its stores.
After buying an Atmosphere Processor, go to the Main Screen and choose a planet in which to format. Then click on the Planet Formatter Icon. The Message Window gives a readout of how long the Atmosphere Processor will take to do its job. Click the right mouse button or press ENTER to confirm the default name, 'Planet 1'. When it arrives, the Atmosphere Processor begins work immediately without further intervention on your part.
Commissioning Soldiers
Overlord is played in real time - while you are busy attending to one aspect of managing your campaign, life continues throughout the planet system. While you were buying and dispatching the Atmosphere Processor, your troops were hard at it in the military academy on Starbase. By now, the raw recruits should be well on their way to being professionally trained soldiers.
Click on the Platoon Management Icon - it's time to equip and commission the trainees. Two large portrait screens to the left of the Platoon Management Screen show the body armor and weapon type that are currently selected - clicking on the left/right arrows below these windows cycles through the options. The better the equipment, the more expensive it is - and the more men you have in a Platoon the bigger the total equipment bill will be. You'll notice that the total cost of equipping the current Platoon with the current armor and weapon is shown in a window above the running man.
In a real war, strategic decisions have to be taken about how many men you want in a Platoon, how much training you want them to have before they are moved into the army, and how much you can afford when it comes to equipping them. A Platoon of 200 men can cost 20,000 and 109,000 Credits to equip with suits and weapons - the choice is yours.
When you click on the icon that shows civilians turning into soldiers (the Platoon Commission Icon) the current Platoon is commissioned at the current training level with the current equipment - provided you have enough Credits on Starbase to afford it!
For the purposes of this whistle-stop tour round Overlord, it's not too important how well-trained or well-equipped your first Platoons are. Check how many Credits you have available to spend - the total appears in a window towards the top right of the screen, beneath the window that shows the level of the civilian population. Experiment with the suit and weapons selection mechanism and work out what you can afford to buy, bearing in mind that you want to commission four Platoons. Don't spend all your money equipping one Platoon, or you'll have to raise more cash before continuing. You may want to wait a while so that extra funds can be raised from taxes, or you may decide to go to the Government Screen and bump up the tax rate temporarily to raise extra money quickly while you wait for the recruits to attain a higher level of training.
The 1st Platoon has been in training longest, so start by commissioning that Platoon - keep clicking on the down arrow next to the Platoon Identify Window until '1st' appears.
Click on the Platoon Commission Icon. Providing you had the Credits to buy your selected equipment, the 1st is now part of your army. Click on the up-arrow next to the window that identifies the current Platoon, and it displays '2nd'. Click on the Platoon Commission Icon, and the 2nd is now operational. Repeat the process for the 3rd and the 4th Platoons.
Congratulations, you now have an army.
Deploying Platoons
Once Platoons have been commissioned, you now control them via the Combat Control Screen which allows Platoons to be moved from the garrison on a planet into a Battle Cruiser and placed on the surface of a planet.
Click on the Combat Control Icon. Notice how your Platoons - 1st through 4th - appear in the large grid to the left of the Combat Control Screen. The number of men each Platoon contains appears next to its name. All four Platoons are currently on the surface of Starbase; a vertical green bar gives a visual representation of your overall military strength on the current planet. (A digital readout to the right shows how many men you have on the current planet, and reveals your total Military Strength there.)
We're going to ship the 1st and the 2nd Platoons to your new colony once it has been set up by the Atmosphere Processor. Platoons can only be transported in Battle Cruisers, so now would be a good time to buy one. Click on the right mouse button to return to the Main Screen.
Buying a Battle Cruiser
Now it is time to buy a Battle Cruiser then return to the main screen. Click on the Cargo Icon to call up the Cargo Bay Screen. Click on Battle..1's name to make it the current ship for Cargo Bay operations. Now it needs to be fueled as it is going to be used to take two Platoons to your first colony.
Click on the up arrow that contains a picture of a fuel filler nozzle and hold down the mouse button to pump fuel from Starbase's reserves into Battle..1's tanks.
When Battle..1's tanks are full, click on the Crew Icon to assign a crew, then click on the right mouse button to return to the Main Screen.
Click on the Combat Control Icon. Battle..1's name appears in one of the Docking Bays shown at the top left of the Combat Control Screen, and as it is the only craft in a Docking Bay, it is automatically selected as the current craft.
The plan is to send the 1st and 2nd Platoons to your new colony - so they have to be moved on board Battle..1. Click on the '1st' in the large grid to the left, and you'll notice that the identifying details of the 1st Platoon move into one of the four empty cells displayed to the right of the Docking Bay display. The 1st Platoon is now aboard Battle 1 - notice how the military strength readout and the vertical green bar in the center of the screen reduces as you move the Platoon off the surface of Starbase.
Click on '2nd' to load the 2nd Platoon, and notice the further depletion in Starbase's military might that takes place. Click on the right mouse button to return to the Main Screen.
Reviewing Your Colony
Click on the Atmosphere Processor Icon to check on the status of the planet you started formatting a little while ago. (It has probably already formatted by now, as the Message Window will have pointed out, but if it hasn't, wait until you get the message that Planet 1 is now formatted.) Click on the up-arrow to the right of the Star Map to move the Planet Cursor to the planet just above Starbase. The Video Window will now display a view of your newly-formatted planet. There are four different types of planet that can be created by the Atmosphere Processor-Volcanic, Tropical, Metropolitan and Desert - and they each have different attributes.
Now that Planet 1 has been established as a colony, you may wish to click on the Government Screen Icon to discover what you have in the way of population and Resources in the seed colony planted by the Atmosphere Processor. Clicking on the Government Screen Icon will call up the Government Screen with Planet 1 selected as the current planet - assuming you left the Planet Cursor on Planet 1.
Notice that you have a little of everything. Start thinking what equipment you need to buy and send to Planet 1 in order to establish it as a colony, bearing in mind the type of planet it is.
You should have already bought a second Solar Satellite Generator for Planet 1, which is currently orbiting Starbase, and have commissioned a Battle Cruiser and loaded two Platoons onto it, ready for shipment to your new colony. Time to send the craft on their way. Click on the right mouse button to return to the Main Screen.
Click on the Navigation Screen Icon. You will notice Planet 1 is the current planet - and its Docking Bays are empty, so there isn't a current craft selected for Navigational operations. Find Battle..1's name in the central grid that displays the roster of the craft in your fleet, and click on it to select Battle 1 as the current ship for Navigation Screen operations.
Battle 1 is in a Docking Bay on Starbase, so you need to click on the Launch Into Orbit Icon to get it into space.
Now click on the Journey To Planet Icon to initiate the trip. The roster of craft in the central grid is now replaced by a list of the names of all the formatted planets in the planet system. Click on 'Planet 1' as the destination. Notice how details appear in the Journey Statistics panel to the bottom right of the Navigation Screen when you do this - you can see how much Fuel is needed to undertake the journey, and you are given the 'EDA' - Estimated Day to Arrival.
While you wait for Battle 1 to complete the journey, you might as well send one of the Solar Satellite Generators from orbit round Starbase to orbit Planet 1. Click on either 'Solar 1' or 'Solar 2' in your craft roster to select a Solar Satellite as the current craft for Navigation Screen operations.
As the Solar Satellites are already in orbit, all you need to do is click on the Journey To Planet Icon and select Planet 1 as the destination. When your selected Solar Satellite arrives at Planet 1 it will stay in orbit and immediately begin beaming down Energy to the planet surface.
It's worth remembering you can change the current planet while you are using the Navigation Screen - if the last thing you do is click on a planet as a destination, then that planet becomes the current planet within the game when you leave the Navigation Screen. Similarly, if the last thing you do on the Navigation Screen is click on a craft, then its location (or its destination) becomes the current planet.
Battle 1 will now be in orbit around Planet 1. Select it by clicking on its name in the central roster, then click on the Land On Planet Icon to move it from orbit to a vacant Docking Bay on the surface of Planet 1. Click on the right mouse button to return to the Main Screen.
Setting Up A Garrison
Click on the Combat Control Icon to call up the Combat Control Screen. Planet 1 should still be the current planet. Battle 1 is in a Docking Bay, and it contains the 1st and 2nd Platoons; their names appear in the panel containing four grid cells that is located just to the right of the three Docking Bay windows, because Battle 1 is the current ship. The other displays on the Combat Control screen show that there is a military strength of zero on Planet 1.
When you click on the name of one of your Platoons, it is moved to the surface of Planet 1 and a vertical green bar appears on the screen, indicating that you have established a military presence on the planet. Click on the name of the other Platoon that is still waiting aboard Battle 1 and notice how you have boosted your military presence on Planet 1 even more.
End Of The Tour
You have now got Starbase up and running efficiently and established a colony on Planet 1: The Quick Start Tour is now complete and you can begin to play in earnest on your own. From here on it's your skill against the skill of the enemy commander.
-Good Luck-