Copy Link
Add to Bookmark
Report
Captain Blood

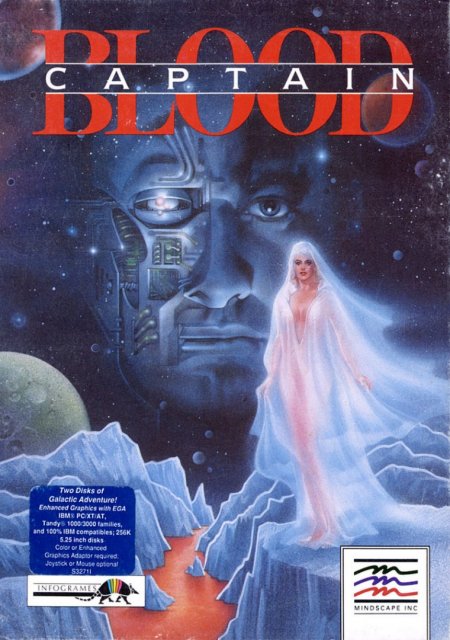

CAPTAIN BLOOD
1 Preliminaries, Izwal, Buggol,
Croolis-Ulv
2 Torka, Tube-Brains, No No
3 Trauma, Good Mind, Kingpak
4 Tricephal, Robheads, Torka Torka
Torka, Two Endgames
5 Afterwords
CAPTAIN BLOOD
Part 1
PRELIMINARIES
The most important tool you have to explore the complex geopolitical terrain of
Hydra is UPCOM: the Universal Protocol of Communication. Translating UPCOM icons
to English is a snap: All you have to do is drag your computer finger over them.
But the icon dictionary in the CAPTAIN BLOOD manual lists the icons in the order
they appear on the UPCOM module. So, when you're trying to form your own
sentences, finding the correct word among those hundred and twenty little
pictures can be frustrating.
My suggestion: Photocopy the manual pages with the icons. Then, starting with
the first (the question mark) and moving down the columns, number each icon
("you" is 6, "howdy" 7, etc.) until you reach the end. Finally, cut the icons
(with their translations and numbers) apart, tape them in alphabetical order on
larger sheets of paper, and stick them on the wall next to your computer.
Now, when you need the icon for "different," for example, you can find it
quickly on your alphabetized sheets and, checking the number next to it (60),
know that that icon will appear on the UPCOM module about halfway down the line
(60/120). Sounds a little kludgey, but after you've wrestled with UPCOM for a
while, I think you'll see the utility of it.
I also advise studying the "Tips and Hints" section of the BLOOD reference
booklet and making a flow chart showing who can lead you to whom. (The chart I
did, BLOOD.PCX, is available in the CompuServe Gamers' Forum.) This will help
you avoid useless chitchat with vapor-headed aliens. (Studying my chart, for
example, you can infer that Tromps are only going to giggle and say the word
"sex," no matter how silver-tongued you are with them.)
As you may know, all coordinates in CAPTAIN BLOOD are randomized every time you
begin a game, so you won't find any here. I will try to show you how to get to
the guys who can give you the coordinates. The first planet in any given game is
always going to be inhabited, but the chances of finding another inhabited
planet on your own are about one in five hundred. That being the case, the only
logical thing to do is get down there on that first planet, and strike up a
conversation!
The OORXX -- an acronym, presumably -- can withstand seven crashes. So, you
don't have to be especially timid while learning to fly it. Remember, too, that
if a missile is closing in on you, sometimes the best wisdom is to crash on
purpose, hug the ground until the missile recedes, then take off again like the
proverbial shot.
Write down all planet names, coordinates, and inhabitants, including the first
(you may have to come back). This is _very_ important!
IZWAL, BUGGOL, CROOLIS-ULV
The first alien you encounter will always be one of four: Yoko (an Izwal), a
friendly little guy with yellow-brown skin and a long tongue; Dead Genetic (a
Croolis-Ulv), a big purple humanoid with a bad attitude; Pop Unknown (a Buggol),
a centipede type who looks like he's going to jump out and grab your nose; or
Great Bounty (a Migrax), with a head like the creature in ALIEN except it's
silver (he's also a lot friendlier once you get to know him). Where you go from
here depends on which of these fellows you have to deal with first. So, I'll
outline the four separate beginnings, then we'll meet up for the middle game.
YOKO START
Identify yourself and tell Yoko you're his friend ("Me Blood me friend" -- the
BLOOD manuals have several good syntactical hints for speaking with aliens). By
following up on the allusions Yoko makes to various peoples and places, you'll
discover that the planet you're on is called Bow-Bow; that the Izwal are a
peace-loving folk; that Yoko is looking for a girl friend; that the Ondoyante
are apparently the foxes of choice in this particular galaxy; that there is a
connection between Yoko's father (Maxon) and the Croolis-Ulv (Dead Genetic),
since Maxon (a renowned scientist) helped Dead Genetic achieve genetic
reproduction.
The ability -- or lack of it -- to perpetuate one's species is a major concern
of the inhabitants of Hydra, and it motivates many of their actions (unlike us).
The plot thickens as you learn that Maxon is missing and Yoko wants you to find
him; and it positively congeals as the little guy warns you that the duplicates
themselves are seeking a means of reproduction.
As you know, you have to track down and disintegrate all five currently
existing Blood duplicates before you're out of danger. But if they should start
to multiply before you can get to them....
TELEPORTING YOKO
Ask Yoko about Pop Unknown (the Buggol), and get the coordinates for his
planet. Get the info for Dead Genetic's planet, if you haven't already. "You say
planet Dead Genetic." Keep repeating things if you don't get the right response;
timing's really important with these critters. Then, and only then, teleport
Yoko to another, uninhabited planet.
Make sure you understand the difference between teleportation and
disintegration. You only want to disintegrate the duplicates by pressing the
circle-arrow icon below the fridgitorium when you've got one of them trapped
there. To teleport an alien from the fridgitorium to a new planet, you first
have to successfully land an OORXX, and then press the teleport (T-arrow) icon
to the left of the UPCOM module. What? You teleported Yoko and he died? You
watched that cute little guy waste away right before your eyes and didn't lift a
finger to help? Nice going, ace; you're off to a great start!
CROOLIS-VAR PLANETS
Proceed to Dead Genetic's planet, Trap 4. The Croolis-Ulv and Croolis-Var are
basically a bunch of lizard-brained geeks with chips on their shoulders, but you
have to deal with them. Tell Mr. Genetic (who's a Croolis-Ulv, remember) that
you want to destroy the Croolis-Var; tell him he's a great warrior; tell him you
think he's cute. It doesn't really matter what you say, because he isn't going
to give you the information you need until he's good and ready (when he says "Me
kill time," he's not kidding).
Don't get discouraged; just keep pounding away with things you think he wants
to hear (ask him to give you information; tell him you know Maxon; rant and rave
about how much you want to kill his enemies). Eventually he'll get tired of
horsing around and give you the coordinates to four Croolis-Var planets: Trap 2,
home of Good Nonsense; Great Fear, home of Male Warrior; Kill You, home of Bad
Crazy; and Trap 1, home of Poor Genetic (a distant relative, presumably).
Dead wants you to kill them. If you do, and come back looking for your big
reward, he'll tell you he wants to "reproduce" with you: Trust me, you don't
have to kill anybody. After he gives you the coordinates, he'll kick you off his
planet; you'll be only too happy to leave.
POP UNKNOWN'S PLANET
Now, use the other coordinates Yoko gave you and hit Pop Unknown's planet,
Spirit 137. There's a chance Yoko may have given you another Buggol planet,
Rosko 2, home of Good Unknown. If this is the case, this section is optional.
The Buggol like to whine about their sex lives; humor them. Then, ask Pop
Unknown about Morlock and say you want to vote for him. He'll give you the
coordinates to Rosko 1, Morlock's planet. Check the Buggol section of the BLOOD
manual for some background on the political scene. Then go to Rosko 1 and let
Morlock try out his campaign speech on you. He fancies himself the peace
candidate, though he'll later ask you to kill the incumbent president, an
upstart Yukas named Rosko (not to be confused with the Buggol planets Rosko 1
and Rosko 2).
Vote for Morlock ("Me vote Morlock") and he'll give you (after some additional
jabber) the coordinates for Female 021, Rosko the Yukas's planet. Touch down on
Female 021 for a look at Rosko (he's an eyeful), but don't expect any real
information there: Rosko and Morlock aren't interested in much except wiping
each other off the face of the galaxy. Finally, head back to Spirit 137. Pop
Unknown should now be forthcoming with the coordinates for Good Unknown on Rosko
2.
GOOD UNKNOWN'S PLANET
Good Unknown will prove to be one of your most valuable allies. After you
listen to his woman troubles, he'll beg you to take him away from all this. Ask
him for the Izwal code, then teleport him to any uninhabited planet (don't
forget to jot down the coordinates). If he likes it there, he'll give you a new,
unidentified set of coordinates, and send you back to your ship. Return to him
immediately using the OORXX reactivator button (the question mark below the
OORXX) and say "Me want know planet Migrax Great Bounty." After he gives you
those coordinates, proceed to the "Great Bounty Start" section below.
DEAD GENETIC START
Review the "Croolis-Var Planets" section above. The only real difference if
Dead Genetic is your first encounter is that you have to work fast and learn
Yoko's coordinates before he gets generous and starts dispensing the Croolis-Var
info. Once he's done that, he'll boot you off Trap 4 and not let you back on
again until you've vaporized the Croolis-Var planets (which you don't want to
do).
As soon as the old Deadhead lets you get a word in, bombard him with sentences
like "Me search Yoko" and "Me want know home small Yoko." Eventually he'll admit
he knows him, acknowledge his debt to Maxon, and give you the coordinates to
Bow-Bow, Yoko's planet. Then, go into the "Me want kill enemies" routine
outlined above until he comes across with the Croolis-Var coordinates as well.
But get Yoko's location first! Now, visit Yoko, following the instructions
detailed in "Yoko Start" and "Teleporting Yoko." After you've lost the little
guy, continue with the instructions in "Pop Unknown's Planet" and "Good
Unknown's Planet." Then, proceed to the "Great Bounty Start" section below.
POP UNKNOWN START
Begin with the "Pop Unknown's Planet" and "Good Unknown's Planet" sections
above. But after you get Great Bounty's coordinates, return once more to Good
Unknown and say, "Me want know planet Yoko." Proceed to Yoko's planet and follow
"Yoko Start," "Teleporting Yoko," and "Croolis-Var Planets." Then, continue with
the "Great Bounty Start" section below.
GREAT BOUNTY START
Review the Migrax description in the BLOOD manual. The Migrax are really cool,
though a bit irascible off the top. (The BLOOD game I finally succeeded in
solving started with Great Bounty, so I'm kind of partial to these guys.)
After he's had his little joke -- "Me say information Migrax Missile
Brave/Missile Brave kill you (laugh-curse)" -- ask him if he wants to be
teleported. The Migrax love to travel, so sooner or later he'll agree. When you
get him to another planet, prompt him with a question or two about the
Ondoyante, then follow up on everything he says. Be persistent. Don't be too
quick to take him back home, no matter how much he whines; you'll get more out
of him here.
Some of what he'll say is a bit cryptic -- "Go planet equals free brain
spirit"; "Kill vote dead (sob-sob)" -- but when he finally mentions Planet
Spirit, reply with "You say information Planet Spirit," "Me want know
coordinates Planet Spirit," etc., and you should get some solid information.
If you don't have them already, hit him with "You say planet Buggol," and
you'll get Good Unknown's coordinates. Finally, try, "You say planet Missile
Brave," and you should get the (very crucial) coordinates to Reproduction 128
(once these Migrax start talking, you can't shut them up).
At this point he may send you back to the ship, but if he does, go right back
down again by pressing the OORXX reactivator button, and you'll get a second
chance to take him home (he'll even give you the coordinates in case you've
misplaced them). Then, and only then, return Great Bounty to Reproduction 14.
He'll be so grateful he'll confide that the Antenna know where to find the
Robheads (file that bit away for now). Then, he'll announce that he's got a hot
date and kick you off his planet. If you set down there again, he'll be gone.
If you started the game with someone other than Great Bounty, proceed now to
Part II. If Great Bounty was your first, use the coordinates he gave you to find
the Buggol Good Unknown. Good Unknown is a veritable gold mine of information.
After he tells you his problems, he'll beg you to take him on a vacation. Ask
him for the Izwal code, then teleport him to any uninhabited planet (don't
forget to jot down the coordinates). If he likes it there, he'll give you a new,
unidentified set of coordinates, and send you back to your ship.
Return to him immediately using the OORXX reactivator and say "Me want know
planet Yoko." Go to Yoko's planet and refer to "Yoko Start," "Teleporting Yoko,"
and "Croolis-Var Planets" to find out what to do next. The Pop
Unknown-Morlock-Rosko subplot ("Pop Unknown's Planet") is basically a dead end,
but do it for the fun of it if you have time. (If your arm is shaking without
remission, then you probably don't have time; see the time note in the
"Afterword" section of this walkthru.) Now, proceed to Part 2.
CAPTAIN BLOOD
Part 2
TORKA, TUBE-BRAINS, NO NO
By this time you should have accomplished the following tasks (not necessarily
in this order): visited Dead Genetic and Pop Unknown (and, optionally, Morlock
and Rosko the Yukas); taken Good Unknown to a planet he likes and left him
there; after questioning Yoko, taken him to a new planet and inadvertently
killed him; taken Great Bounty to a new planet, interrogated him, returned him
to Reproduction 14, and witnessed his departure for planets unknown.
As a result of the above hijinx, you should now be armed with the following
information: the coordinates to four Croolis-Var planets (Trap 1, Trap 2, Great
Fear, and Kill You); the coordinates for Good Unknown's new planet (the one you
took him to); the Izwal code "friend friend" (which is almost the key to the
city in this galaxy -- all sorts of people respond to it); the unidentified set
of coordinates Good Unknown gave you; the coordinates for Planet Spirit; and the
coordinates for the Migrax Missile Brave.
If you're missing any of this stuff, or if you haven't done all of these
things, you're going to be in deep trouble later on. Go back and pick up what
you need; or, if your arm's gotten too palsied, make a game plan and start the
game over (see "Afterword"). If your checklist is complete and you're in
reasonably good health, pat yourself on the back, save the game, and read on.
Let's use that mysterious set of coordinates Good Unknown gave us (the
unidentified ones). When you touch down, you'll be face to face with your first
duplicate (Duplicate 2, actually). Disintegrate him now if your arm's getting
uncontrollable, but if it isn't, leave him in the fridgitorium until you need
him (why take aspirin before you've got a headache?). Whatever you do, do _not_
teleport him out of the fridge once you've put him in there; you'll never get
him back.
Now, jet over to Planet Spirit and meet Torka. No matter how you randomize
them, her coordinates are definitely 36-24-36. At present, however, she's scared
to death, and she's got enough sense to know this isn't the best time for
socializing. She'll give you the coordinates to Brain 4, home of her friend
Tubular-Brain, and then she'll split.
Proceed to Brain 4 and try to strike up a conversation with the Tubester. (If
you get anything intelligible out of him, I'd sure like to know!) Remember poor
Yoko pleading with you to find his pop? Feeling a little guilty about
terminating the small dude? Let's see if we can write that subplot a happier
ending. Unfortunately, that means going back to the land of the macho geeks.
Pick any one of the Croolis-Var, just so long as it's Good Nonsense. Say things
like "You want information Croolis-Ulv?", "Me want give information," and the
ever-popular "Me want kill enemy." After the usual posturing and so forth, he'll
fork over the coordinates to Bad Trap, home of the Croolis-Ulv, Howdy Prison.
Head over to Bad Trap and let Mr. Prison jerk you around until he comes up with
the coordinates for Great Destroy, a Croolis-Var stoolie and info salesman.
Then, start drilling him (Howdy Prison) about Maxon. Try, "You say identity
planet Maxon." As usual, you may have to repeat it about ten times. Make sure
you get both the coordinates and the planet name. Finally, go see the
Croolis-Var Poor Genetic and feed him the usual line of guff. Eventually, he'll
admit he knows an Izwal named No No who lives on Idea 347. Get the coordinates,
touch down on Idea 347, and you'll discover....
Yoko! The little guy faked his own death! Hard to decide whether to hug him or
kick him, isn't it? Anyway, he's glad to see you, and he's very anxious about
his dad. When he asks, tell him "Identity planet Maxon equals Rendezvous 67."
He'll reward you with the coordinates for Duplicate 1.
Duplicate 1 is a whole other can of worms. Whereas Duplicate 2 just kind of
whined impotently until you fridged him, Duplicate 1 wants to make deals,
promising to rat on Duplicate buddies 2, 3, and 4 if you let him go. If that
makes you suspicious, good going: You and I both know that Duplicate 2's already
strumming harps. But play along. Write down the coordinates in the order he
gives them to you. If that fourth set he throws in makes you even more
suspicious, better going still: It's the planet you're standing on. Micro the
little weasel.
CAPTAIN BLOOD
Part 3
TRAUMA, GOOD MIND, KINGPAK
Review what the manual says about the Ondoyante. Then, take a deep breath and
set your galaxy map for the first set of coordinates Duplicate 1 gave you. This
is Trauma, and she's nobody's sweetheart. After she finishes dressing you down,
she says something about a rendezvous with a great male, reels off some
coordinates, and sends you back to your ship. Go back down to her and offer her
a lift. Take her to the coordinates she mentioned, and all of a sudden she
doesn't look so bad. Looks aren't everything though, are they? Lose her. (To
give her some credit she may volunteer the coordinates for No No; but, then, you
already have them, don't you?)
Go far back in your records, now, and find the coordinates Great Bounty gave
you for his fellow Migrax Missile Brave. He'll welcome you with open arms
because of your civilized treatment of his friend, and give (without much
coaxing) both the Sinox code and the coordinates for Good Mind. When he asks you
to leave, be a gracious guest and beat it; don't pester him any further right
now.
Proceed to 128, Good Mind's planet, and give him the Sinox code "impossible not
Sinox" to loosen him up. The Sinox can be a bit stuffy, but they're basically
all right (at least we're dealing with the higher intelligences now). Good Mind,
however, has a problem, and he's not above asking you for help. It seems he
needs four members of the Antenna race moved so he can annex their planets
("Planet help me know radioactivity spirit": These guys are into some weird
stuff).
You may be tempted to say, "Look pal, I've got my own problems," but hold on a
microsec. Didn't Great Bounty say something about the Antenna knowing how to get
to the Robheads? The BLOOD manual would have you believe that the Robheads are
harmless, but if you check the hints in the reference booklet, it'll tell you
they're "the real masters of Hydra." I guess you'll be wanting to take that
assignment after all.
So, get the coordinates to the four Kristo planets from Good Mind, then head on
out. Antenna 1 on Kristo 15 will waffle when it comes to teleporting, so wait
until he's in the mood, then grab him fast. Other than that, it's pretty routine
stuff. (Yes, you do have to move all four of the Antenna to uninhabited planets,
and be nice about it.) The real reason you're here is to ask them the following:
"You know planet Robhead?" Each Antenna will give you a different set of
coordinates. Write them down and guard them with your life.
And remember, they're important, these coordinates; you're glad you got them.
It's imperative you remember that they're important, because the return to Good
Mind is going to be pretty much of a letdown. Even though he promised you a
Duplicate, all he's got now (besides a mouthful of "Much obliged") is No No's
address, which everybody and his brother seems willing to give out. (By the way,
don't be tempted to get into any kind of teleportation scene with Good Mind;
he'll run you ragged, and you won't get a thing for your trouble.) But then
again, with all those folks pointing us back toward No No, maybe we should pay
our little friend another visit.
No No's happy to see you (No No's always happy to see you!), so ask him about
the Duplicates again. He'll give you the coordinates to the planet where
Duplicate 1 was found. (Thanks a lot, No No; maybe a little B-12 for that
short-term memory loss, eh, buddy?) There's also a chance No No may be freaking
out by this point, telling you the Duplicates want to kill him. If he sends you
away and you drop back down and he's gone, that's what's happened. Not to worry.
Time now for a little Tromp run. Contact either Good Unknown or Tubular Brain
for Kingpak's coordinates (yes, Tubular Brain). After he finishes reeling off
those stolen credit card numbers or whatever they are, give him the Izwal code,
and ask him about Kingpak. As it turns out, they're buddies.
Basically, Kingpak's a joy cruiser who spends most of his time getting high on
Tromp tails. But he's also into racing, and he can't help but notice you've got
a pretty cool ship. Race him to the first set of coordinates he hits you with.
You'll lose, but he's a good sport, and offers you a two-out-of-three deal. When
you hit that second planet you'll encounter....
Torka, overdressed as usual. She teleported Kingpak elsewhere, she says, to get
him out of the way (get those coordinates)..."so the two of us can be alone,"
you might be thinking. But nobody in Hydra takes time anymore to stop and smell
the roses, so she'll be gone before you can say "pneumatically pulchritudinous."
Better luck next time. Use the coordinates she gave you to catch up with
Kingpak.
By this time, Kingpak's totally stoned, and totally in awe of your prowess as
an aviator. As you'd expect from someone who enjoys Tromp tails so much, he's
got a headful of Tromp coordinates, which he'll give you freely. Next, he says
he's got an important meeting (again, get those co-ords), and splits. Follow him
to the next planet and offer him a ride in your cool ship (he may even ask you
before you open your mouth). Put him down on an uninhabited planet; he won't
like it and will suggest an alternative. Make a note of it, tell him you'll
catch him later, and hit the darkening skies.
Now, visit one Tromp and one Robhead of your choice (when you've seen one,
you've seen them all). They have very different ways of communicating, but
you'll get the same amount of useful information out of each of them. The Tromps
only have one thing on their minds, and the Robheads are so spaced they make
Timothy Leary look like George Bush.
Next, wracked with disappointment, check your notes for Maxon's coordinates,
and go there. Incidentally, if you now compare your Kingpak and Antenna notes
with your old Duplicate 1 notes, you'll discover that those other coordinates
Duplicate 1 gave you -- in addition to the sets for Trauma and the Duplicate's
own planet -- were for Tromp 1 and Robhead 1. Just thought you'd like to know.
When you find him, Maxon will be very skittish because of his fear of the
Duplicates; he won't let you stay long. After he shoos you away, go back down
and, when he asks you for the Izwal code again, say (all at one time) "Code
friend friend me know planet Yoko." He should give you some coordinates.
Unfortunately, they'll be the same coordinates No No gave you last time, for
Duplicate 1's planet. Evidently, this memory-loss thing runs in the family.
As you pause, suffering from extreme disappointment, a still, small voice in
the back of your head starts whispering "Kingpak, Kingpak." Either you're dying
for a Tromp tail, or you just got an idea. Find the coordinates for the planet
Kingpak wanted to go to and shoot yourself there. It's....
Duplicate 4, with a line of jive as long as an Izwal's tongue. "Small nonsense
brave not. Rendezvous not not small brave idea warrior. Planet warrior destroy
destroy. Destroy fear brave warrior. Warrior fear idea." Sounds like Tarzan
reading the "Bhagavad Gita." Store Duplicate 4 in a cool, dry place; take only
as directed.
CAPTAIN BLOOD
Part 4
TRICEPHAL, ROBHEADS, TORKA TORKA TORKA
Okay, we've exhausted most of our information sources except for the Robheads,
and no one can make heads or tails out of what they're saying. So, when you need
wisdom, when you need compassion, when you need some deeper understanding in
full harmony with nature and completely unimpeded by the baser instincts, who
are you going call? That's right, those Croolis-Var and Croolis-Ulv (who were
you thinking of?). We haven't talked to, let's see here, Bad Crazy, Male
Warrior, Insult 4, and Great Destroy. I don't know, call me crazy, but I've just
got a feeling about that Great Destroy. Sounds like class with a capital "K."
Punch that hyperspace activator.
Well "capital" is right. Great Destroy is kind of the Rockefeller of Hydra and
makes no bones about it: "Me love money." As I mentioned earlier, he's an
information broker. Give him the usual Ulv-Var song and dance until he asks you
to search for the Croolis-Ulv. Then, he'll send you up to your ship. Go back
down to him immediately and give him the names of the three Ulv planets you
found (Trap 4, Bad Trap, and Insult 80). In return he'll supply you with
directions to Idea 762.
On Idea 762 you'll find Small Friend, another Izwal. Now, if you check the
directory of aliens in the back of your manual, you'll discover there's only one
race you haven't dealt with yet: the Tricephal. And "Tricephal" is an UPCOM word
that Small Friend knows. Give him the Izwal code if he drags his feet, then coax
the necessary coordinates out of him.
The Tricephal in question is called Good Friend, and he lives on Small Home.
The "Hints" section of the reference booklet would have you believe that Good
Friend is one of only two sources for the whereabouts of Brain Radioactivity,
the Sinox who holds the key to communicating with the Robheads. The other is
supposed to be our old pal Dead Genetic, but I could never get anything out of
him, except Yoko and those four Croolis-Var he's so obsessed with.
The situation is complicated by the fact that Good Friend, once you've made his
acquaintance, seems never to have heard of Brain Radioactivity (also, he's a
friend of the Duplicates, so watch your step). But he will, if encouraged, start
talking about someone named Entrax. In fact, if you've been paying attention,
you'll notice he's the only cat in the galaxy who has the Entrax icon in his
vocabulary. Entrax lives on a planet called, simply, 256. Shoot over there ASAP!
It turns out Entrax and Brain Radioactivity are one and the same (why the
pseudonym, I wonder?). He's all too willing to help, but he doesn't know where
the Robheads are hiding. Give him the stats on all four Robhead planets and
he'll agree to intercede with them on your behalf. Actually, he plans to give
them some sort of genetic implant: "Me give great genetic Robhead." Then, wend
your way back to Robhead 1 on Planet 145, and save the game!
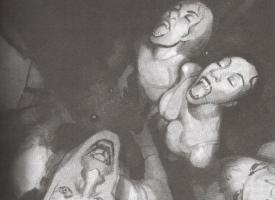
Well, you'll find that the Robheads are making sense now...grim sense. Robhead
1, for starters, wants you to kill Maxon. The hints say that once the Robheads
start talking, you'd better do what they say. But wait a minute. Ever heard
about those psychology experiments where subjects can be talked into giving
seemingly painful shocks to pseudo-subjects, simply because there's an authority
figure (the psychologist) telling them it's okay? And remember all those war
criminals who were "just doing their jobs"? Sit back, friend, friend friend, and
take a deep breath.
We had four beginnings, right? So, what's wrong with a couple of endings?
NEANDERTHAL ENDGAME
After listening to Robhead 1, destroy Maxon's planet. Go back to Robhead 1 for
instructions to see Robhead 2.
After listening to Robhead 2, destroy the planets of the three Croolis-Ulv and
five Croolis-Var. (Robhead 2 says four Croolis-Ulv and four Croolis-Var, but
everybody gets them confused.) Go back to Robhead 2 for instructions to see
Robhead 3.
After listening to Robhead 3, destroy the planets of Good Mind and Brain
Radioactivity. Go back to Robhead 3 for instructions to see Robhead 4.
After listening to Robhead 4, destroy the planets of Great Bounty and Missile
Brave. Go back to Robhead 4 for the coordinates to Duplicate 3.
Duplicate 3 says he has a great rendezvous at hour 320, and pleads with you not
to disintegrate him until then. But what's that to a tough guy like you? Go
ahead, fry him.
Now, all you need are the whereabouts of Duplicate 5 and Torka, right? Hit the
road, pal. Figure it out for yourself, you butcher.
COOL GUY ENDGAME
Leave Robhead 1 and go straight to Robhead 4. He wants you to kill the Migrax.
Go to Reproduction 14 and confirm that Great Bounty hasn't come back yet.
Disintegrate the planet. Then, go to Reproduction 128 and meet with Missile
Brave. Don't tell him what the Robheads are up to: the Migrax are an emotionally
delicate race, and you don't want to upset him.
Instead, start quizzing him about everyone you can think of. Say "Me want
information Antenna," "Me want information Tricephal," "Me want information
Tubular-Brain," etc. If he sends you away, go back to him, and start right up
again. Eventually, probably thinking, "Geez, what a bore this guy's turned out
to be," he'll beg off with a "Time is money" and a "Bye great friend," and leave
the planet. After you're sure he's gone, vaporize Repro 128, and return to
Robhead 4.
The Robheads are smart, but they're not omniscient (the fact that one of them
thought there were four Croolis-Ulv has clued us into that). When you get back
to Planet 403, Robhead 4 will think you've wasted the Migrax and react
accordingly, giving you the coordinates to Duplicate 3.
Duplicate 3, as noted above, will say he has an important rendezvous at hour
320 and beg you not to fridge him until then. Give him a break, give yourself a
break: Go get a sandwich and come back when the ship's clock says 320. He'll
still be there. And he'll capitulate like an honorable man.
Maybe these Duplicates aren't as shifty as we thought they were. Maybe they're
just trying to get by, like the next guy. In defense of non-violence, Albert
Schweitzer said, "I am life that wills to live, in the midst of life that wills
to live." I guess that could be said for all those Duplicates, too -- even old
Duplicate 1, the bozo with the erroneous coordinates.
Or were they? He said Duplicate 5 would be at coordinates ____/____ (fill in
the blanks). But he didn't say when, did he? Check it out now.
"You've searched for me, Blood. I will give you some great information. You
must destroy me, yes Blood. You go search for Torka. Torka loves you. You
teleport Torka. Yes Blood. You are a great warrior. Bye Blood. Torka loves you.
Torka's planet is Corpo. Coordinates ____/____. You are I. I am you. You and I
both love Torka. You-equal-I equals great genetics."
Head for Corpo and receive the hero's welcome you're entitled to. Then, move
Torka to your ship. As the reference booklet promises, she doesn't stay in the
fridgitorium.
I hope you and the Ondoyante have a hundred little Bloods, just like she says,
and live happily ever after. (Just don't let her start eating too much.)
CAPTAIN BLOOD
Part 5
AFTERWORD: ASSORTED MUSINGS
THE TIME THING
Since you're playing against the clock, the great unknown quantity in this game
is the time factor. The manual says you have 2.5 real-time hours between
Duplicates before your arm starts shaking so badly you can no longer function. I
have no idea how a different computer speed might affect your info-gathering
efficiency in this regard.
Where there's been a choice, I've tried to order the steps of the walkthru in a
dramatic way, but it may be that some of you simply can't complete all the steps
to the first Duplicate in time because of hardware limitations. So keep in mind:
Some things have to be done in a certain order, others can be switched around.
Use your common sense.
It becomes obvious after a certain point that you would never have found No No
unless you moved Yoko first. On the other hand, you can take advantage of those
"unidentified" coordinates from Good Unknown as soon as he gives them to you if
your arm is going berserk. The bottom line is: If your arm keeps going bad on
you too soon, study the whole walkthru to get the big picture, and make a game
plan, spacing out the disintegration of the Duplicates so that you're always in
good health.
AND SPEAKING OF THAT SHAKY ARM
You can actually -- and this is one of those things you find out on your own
when the chips are really down -- maneuver around Hydra fairly well with a
palsied arm. In the first stages of V.F.D. (vital fluid drain), you simply wait
for those intervals when the shaking stops, then take care of business quickly.
But even after the arm's completely whacked, you can still do a number of
things. You can set coordinates on the galaxy map: Watch how the line alternates
between two numbers once you've fingered it, adjust it so the desired coordinate
is one of those numbers, then be quick with the old trigger finger. You can
travel, pilot an OORXX (totally unaffected by arm rot), and -- to some extent at
least -- communicate (icons with blackened-out neighbors are easiest, because
you're not as likely to select the wrong one). I mention this only because it
illustrates what my old yoga teacher meant when he said, "Despair is almost
always premature."
SAVING GAMES
CAPTAIN BLOOD only allows for one saved game. But it is possible to explore
alternative plot lines and not have to start from scratch every time. When you
get to a point where you want to save, hit the save icon, and quit (which, at
least in the IBM version, means rebooting your computer). Then, transfer the
BLOOD.GAM file (the only saved game the program recognizes) to a new
subdirectory or floppy, and give it a name that's unique to that game. This way,
you can build a catalogue of different games-in-progress. When you want to pick
up with one of them, copy its file back to the subdirectory or floppy with the
BLOOD program files, and change its name back to BLOOD.GAM.
MY THEORY
I think there's an evil genius behind all this: the Sinox Brain Radioactivity
(aka "Entrax"). After all, the Robheads are just a bunch of helpless hippie kids
-- until Brain Radioactivity finds out their locations (which you, of course,
unwittingly give him), and then proceeds to tinker with their genes. I think he
programs the Robheads to order you to kill everybody else so that he can be the
master of Hydra. Then, of course, in classic B-movie style, the creature turns
on its creator: Robhead 3 tells you to kill both Sinoxes, not just Good Mind, as
Brain Radioactivity wanted.
Anyway, it helps explain the alias. Time equals money. Me go. Bye great friend.
CAPTAIN BLOOD is published by Infogrames and distributed by The Software
Toolworks.